EaseWatcher: DIY A Smart Surveillance System
Building a Smart Surveillance System: A DIY Approach
Are you concerned about the security of your home? Do you want to stay one step ahead of potential intruders? In this tutorial, we'll guide you through the process of creating a DIY surveillance system called EaseWatcher that detects unwanted visitors, captures their images, and sends notifications to your mobile device. With this system, you'll be able to respond quickly and provide authorities with valuable evidence to aid in their investigation.
To build EaseWatcher, you'll need some basic hardware components, but don't worry - we've kept costs low by using affordable materials. The cameras are the most significant investment, but they offer a wide range of possibilities, making them a worthwhile addition to your DIY project.
Let's take a look at the system architecture, which consists of several interconnected elements:
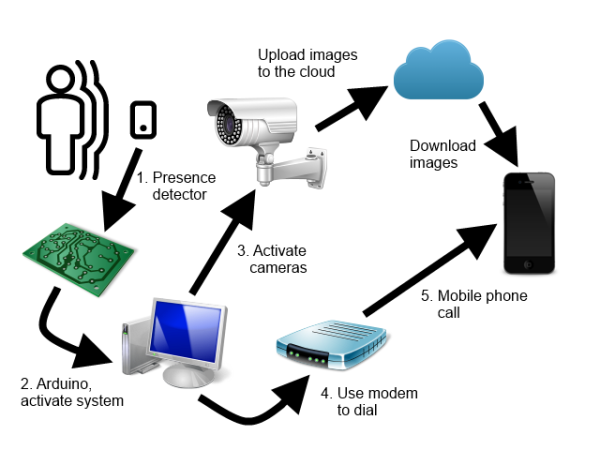
While the diagram shows specific subsystems, we've designed the solution to be modular, allowing each component to be developed independently. This is achieved through the implementation of a common interface and dependency injection, which links each element to the application. The subsystems and protocols involved are:
- Camera interface: defines communication with video cameras
- Storage interface: handles file transfer, image storage, and control commands
- Trigger interface: activates the surveillance system
- Alarm interface: remotely notifies users of incidents
We've built this solution using Visual Studio 2015 and.NET Framework 4.5.
Please note that due to file size limitations, we've had to remove some files from the source code, including NuGet packages, obj directories, and binaries. While you can restore packages through Visual Studio, you may encounter issues with recompiling the code. If that's the case, you can download the complete project files from our website.
Hardware Components: A Flexible Approach
When building the EaseWatcher system, I used a combination of hardware components that can be easily adapted or replaced to suit your specific needs. In this section, we'll explore the hardware I used in my implementation, but feel free to experiment with different options to create your own customized setup.
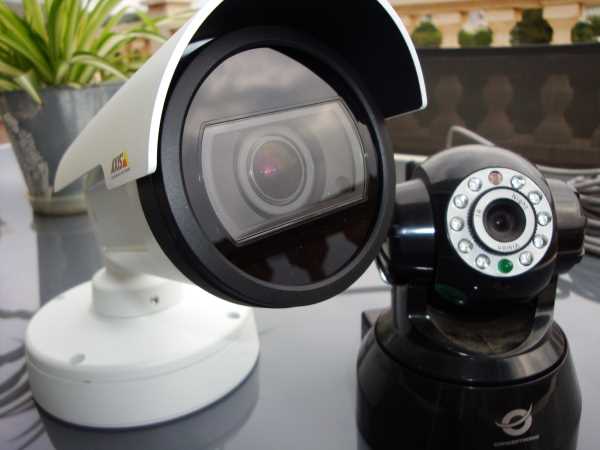
Cameras: The Eyes of the System
I employed two IP cameras, each with its own protocol. The more affordable option was a Conceptornic Wi-Fi camera, priced around €50, which uses the NetWave CGI protocol. The second camera, an Axis model, is a high-performance device with a higher price tag, utilizing the VAPIX CGI protocol.
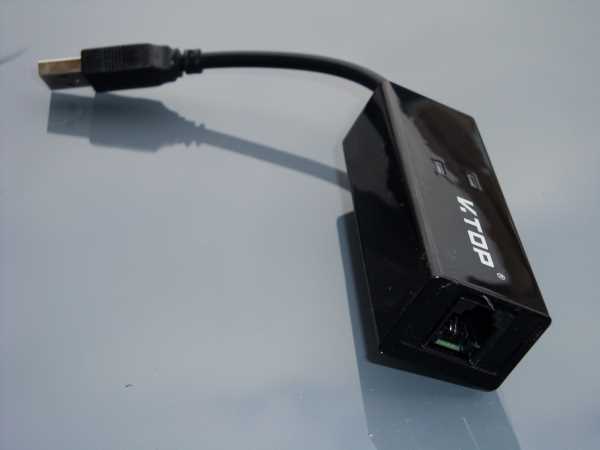
Mobile Notification: A Simple AT Modem
To enable mobile notifications, I opted for a basic USB AT modem, which cost around €17. This device allows the system to send alerts to your mobile phone in case of an incident.
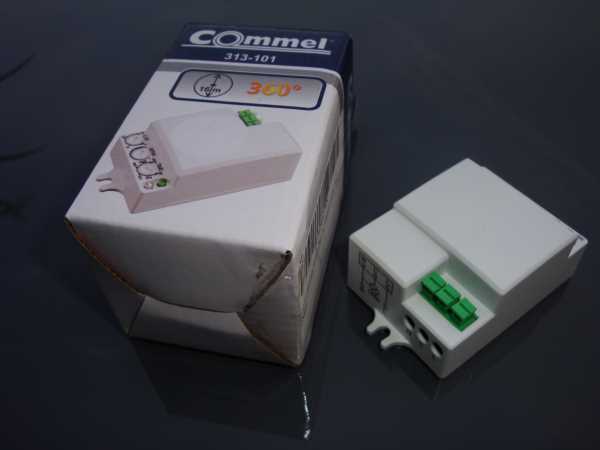
Triggering the System: Arduino and Sensors
For the trigger mechanism, I used an Arduino Mega board (around €20), a presence detector switch (around €10), and a relay. Since the presence switch operates at 220V, it's essential to isolate the Arduino board from the main power source. I achieved this by connecting the detector to a 12V power source, which in turn powers the relay, acting as a switch that closes a circuit between the 5V Arduino power and an input pin.

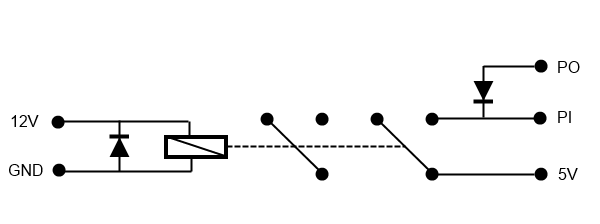
Relay Circuit: A Simple yet Effective Solution
You can easily build a relay circuit like the one I used. Simply connect the 12V power source to the relay reel, add a diode from the ground wire to the 12V wire, and use an input pin (PI) as the trigger pin, an output pin (PO) to force the input pin to 0V when the circuit is open, and the 5V power signal to activate the input pin.
Arduino Code: Pin Configuration
Here's the Arduino code I used, with pin 28 as the input and pin 24 as the output, due to their proximity to the 5V pin on the Arduino Mega board. Feel free to choose alternative pins as needed.
int pin1 = 28;
int pin0 = 24;
void setup() {
// Initialize pins
    pinMode(pin0, OUTPUT);
    digitalWrite(pin0, LOW);
    pinMode(pin1, INPUT);
    digitalWrite(pin1, LOW);
    Serial.begin(9600);
}
void loop() {
    int val = digitalRead(pin1);
    if (val == HIGH) {
        Serial.write(1);
    }
    delay(1000);
}
The Central Control Application
At the heart of the EaseWatcher system lies the control center, a desktop MDI Windows application that orchestrates the entire surveillance process. This application features two primary window types: the control panel and the camera window.
Control Panel
The control panel is where you configure the various protocols, excluding camera settings. The top pane is dedicated to the trigger protocol, allowing you to select the desired protocol, provide a connection string with settings, specify a start and end date/time for surveillance, and configure the number of photos to be taken and the interval between them.
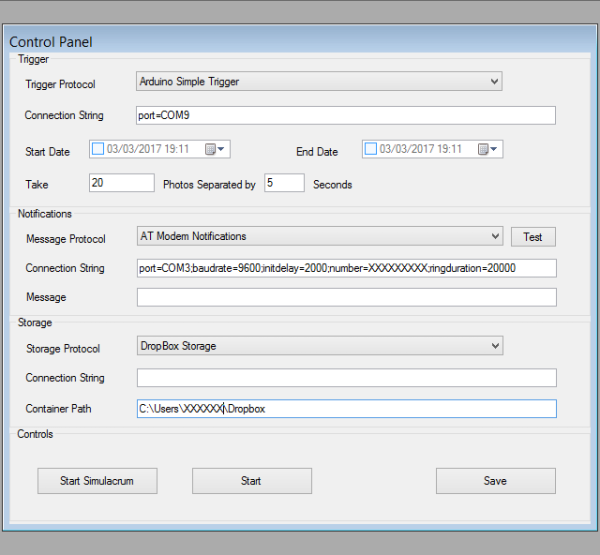
Below this pane, you'll find the notifications (alarm) protocol settings, where you can select a protocol, test it without simulation, and provide a connection string with parameters and an optional message.
The bottom pane is reserved for the storage protocol, where you can set up a connection string, container name, and other parameters as needed.
The command buttons, from left to right, allow you to start or stop the system in simulation mode, start or stop real surveillance, and save changes to the configuration file.
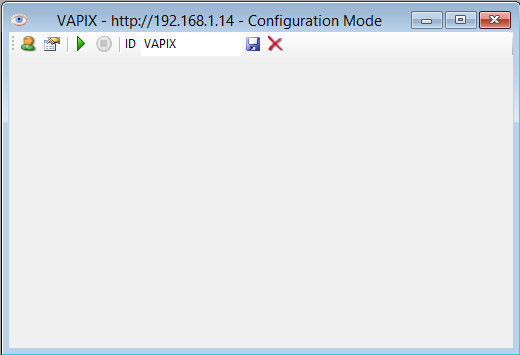
Camera Window
To configure individual cameras, you'll use the camera window, accessible via the File / New Camera... menu option. Here, you'll select the correct camera protocol, provide connection data, camera URL, username, and password. The camera window features a toolbar with buttons to change access settings, show the camera setup dialog box, start and stop the camera, and save or remove the camera configuration.
Configuration Storage
All settings are stored in the application's App.config file, with connection strings in the connectionStrings section and other protocol settings in the appSettings section. Two custom sections, camerasSection and protocolsSection, store camera data and protocol lists, respectively.
The camerasSection contains cameraData elements, each with an id attribute, protocolName attribute, and connectionStringName attribute for connection data.
<camerasSection>
    <cameras>
        <cameraData id="CAMNW"
            protocolName="NetWave IP camera"
            connectionStringName="CAMNW" />
        <cameraData id="VAPIX"
            protocolName="VAPIX IP Camera"
            connectionStringName="VAPIX" />
    </cameras>
</camerasSection>
The protocolsSection lists installed protocols, with each protocolData element featuring a name, class, and type attribute specifying the protocol's implementation.
<protocolsSection>
    <protocols>
        <protocolData name="Arduino Simple Trigger"
            class="trigger"
            type="ArduinoSimpleTriggerProtocol.ArduinoTrigger, ArduinoSimpleTriggerProtocol,
                 Version=1.0.0.0, Culture=neutral, PublicKeyToken=null" />
        <protocolData name="Lync Notifications"
            class="alarm"
            type="LyncProtocol.LyncAlarmChannel, LyncProtocol, Version=1.0.0.0,
                 Culture=neutral, PublicKeyToken=null" />
        <protocolData name="AT Modem Notifications"
            class="alarm"
            type="ATModemProtocol.ATModemAlarmChannel, ATModemProtocol,
                 Version=1.0.0.0, Culture=neutral, PublicKeyToken=null" />
        <protocolData name="Azure Blob Storage"
            class="storage"
            type="AzureBlobProtocol.AzureBlobManager, AzureBlobProtocol,
                 Version=1.0.0.0, Culture=neutral, PublicKeyToken=null" />
        <protocolData name="NetWave IP camera"
            class="camera"
            type="NetWaveProtocol.NetWaveCamera, NetWaveProtocol,
                 Version=1.0.0.0, Culture=neutral, PublicKeyToken=null" />
        <protocolData name="VAPIX IP Camera"
            class="camera"
            type="VAPIXProtocol.VAPIXCamera, VAPIXProtocol,
                 Version=1.0.0.0, Culture=neutral, PublicKeyToken=null" />
        <protocolData name="DropBox Storage"
            class="storage"
            type="DropBoxProtocol.DropBoxStorage, DropBoxProtocol,
                 Version=1.0.0.0, Culture=neutral, PublicKeyToken=null" />
    </protocols>
</protocolsSection>
You can add new protocols to the system using the File / Install Protocol/s... menu option, selecting the class library with the protocol implementation.
Mobile Clients for Remote Monitoring
To ensure that you receive instant notifications of potential intrusions, regardless of your location, I developed mobile apps for the EaseWatcher system. To facilitate rapid development and deployment across multiple platforms, I utilized Xamarin.
The TWClientApp PCL (Portable Class Library) project houses the majority of the client-side code. The platform-specific projects contain minimal code, primarily responsible for saving files and storing images captured by the mobile device's camera, allowing you to swiftly provide evidence to authorities if needed.
As my inaugural mobile app project, it may not be overly complex. I opted not to implement dependency injection, instead focusing on integrating the Dropbox storage protocol. If you wish to utilize an alternative storage solution, you'll need to modify the PCL library code. The Dropbox protocol offers the advantage of allowing users to access images via the Dropbox client, bypassing the ThiefWatcher client (although this approach sacrifices application control capabilities).
Upon launching the client app, you'll need to press the Connect button to initiate a handshake with the main application:
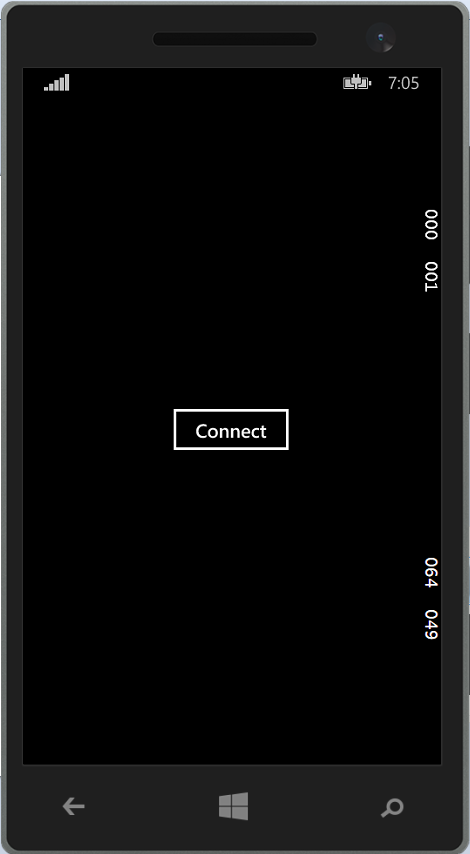
Connecting to the Main Application
Once connected, a list of available cameras is transmitted to the client. Simply select a camera by pressing the corresponding button:
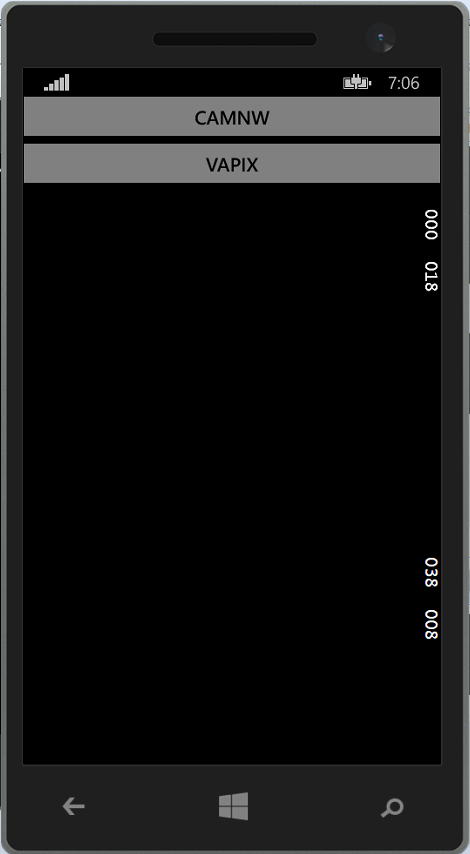
Camera Selection
You can then view the current camera feed. Please note that real-time video streaming may not be feasible due to the latency involved in uploading individual images. While the central control system processes frames in real-time, Dropbox may take up to two seconds to upload each image.
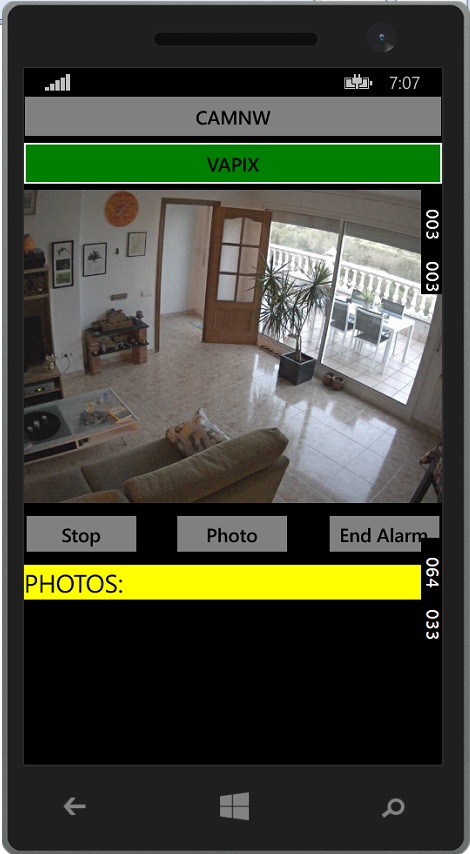
Camera Feed
The app provides controls to start/stop camera feeds, capture photos, or terminate alarm mode (no need to stop cameras before ending alarm mode). Captured photos are listed at the bottom of the screen, allowing you to save or delete them as needed.
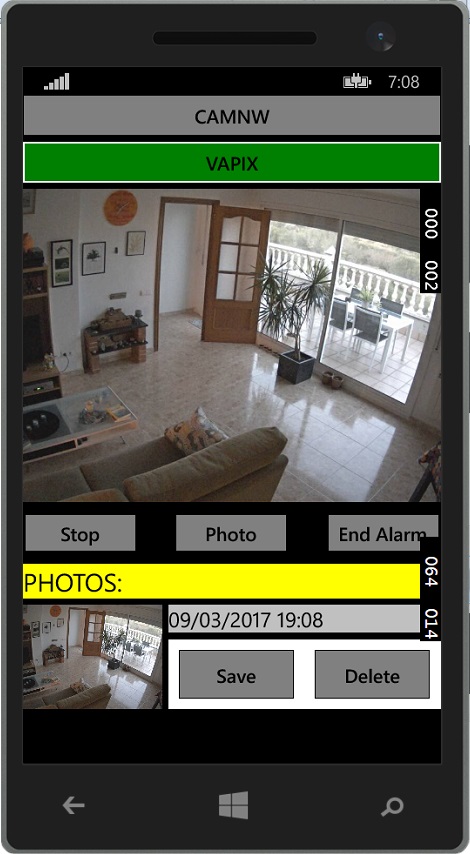
Photo Management
Although I was unable to test the iOS version due to lack of a Mac environment, the Windows Phone and Android apps function as intended.
Working with the Code
The WatcherCommons project defines various protocol interfaces in the Interfaces namespace. The IWatcherCamera interface, for instance, is responsible for camera interactions and is defined as follows:
public interface IWatcherCamera
{
    event NewFrameEventHandler OnNewFrame;
    Size FrameSize { get; }
    string ConnectionString { get; set; }
    string UserName { get; set; }
    string Password { get; set; }
    string Uri { get; set; }
    int MaxFPS { get; set; }
    bool Status { get; }
    ICameraSetupManager SetupManager { get; }
    void Initialize();
    void ShowCameraConfiguration(Form parent);
    void Start();
    void Close();
}
This interface provides essential camera functionality, including event handling for new frames, configuration management, and control methods for initializing, starting, and closing camera operations.
The ITrigger interface, used for trigger protocols, is defined as:
public interface ITrigger
{
    event EventHandler OnTriggerFired;
    string ConnectionString { get; set; }
    void Initialize();
    void Start();
    void Stop();
}
This interface enables trigger condition detection, configuration management, and control methods for initializing, starting, and stopping trigger operations.
The IAlarmChannel interface, responsible for notification protocols, is defined as:
public interface IAlarmChannel
{
    string ConnectionString { get; set; }
    string MessageText { get; set; }
    void Initialize();
    void SendAlarm();
}
This interface provides notification functionality, including configuration management, initialization, and alarm sending.
The protocols implemented in this project include the ATModemProtocol, which utilizes an AT modem to dial phone numbers, and the LyncProtocol, which leverages Skype or Lync for user notification.
The storage protocol, defined in the Data namespace of the WatcherCommons class library, employs two classes: ControlCommand and CameraInfo. These classes facilitate camera command and request interchange in JSON format.
The IStorageManager interface, responsible for storage protocol implementation, is defined as:
public interface IStorageManager
{
    string ConnectionString { get; set; }
    string ContainerPath { get; set; }
    void UploadFile(string filename, Stream s);
    void DownloadFile(string filename, Stream s);
    void DeleteFile(string filename);
    bool ExistsFile(string filename);
    IEnumerable<string> ListFiles(string model);
    IEnumerable<ControlCommand> GetCommands();
    IEnumerable<List<CameraInfo>> GetRequests();
    void SendResponse(List<CameraInfo> resp);
}
This interface provides essential storage functionality, including file management, command and request handling, and response sending.
Two storage protocols have been implemented: the DropBoxProtocol project, which utilizes Dropbox for storage, and a custom storage protocol.
The client-side implementation of the storage protocol is defined in the TWClientApp project and is an asynchronous interface with fewer members than its server-side counterpart.
The client App's code is primarily located in the CameraPage class of the TWClientApp project, which employs a file-based data interchange protocol with specific naming conventions for camera frames, photos, commands, and requests.
In summary, we have explored the various protocol interfaces and implementations that comprise the EaseWatcher system. We have examined the IWatcherCamera interface, which provides camera functionality, the ITrigger interface, which enables trigger condition detection, and the IAlarmChannel interface, which facilitates notification protocols. We have also discussed the storage protocol, which employs the ControlCommand and CameraInfo classes to facilitate camera command and request interchange in JSON format. The IStorageManager interface, responsible for storage protocol implementation, provides essential storage functionality, including file management, command and request handling, and response sending. Two storage protocols have been implemented: the DropBoxProtocol project, which utilizes Dropbox for storage, and a custom storage protocol. The client-side implementation of the storage protocol is defined in the TWClientApp project and is an asynchronous interface with fewer members than its server-side counterpart. By understanding these protocols and interfaces, developers can effectively work with the EaseWatcher system and customize it to meet their specific needs.
For any further details, refer to the download page and download the source code project for reference.