The EaseRobot Series 7: Building an Autonomous House Bot with ROS
Introduction
The EaseRobot project is a hobbyist endeavor aimed at creating an autonomous household assistant using ROS (Robot Operating System). This article marks the seventh installment in the series documenting the project's development.
Background
In the initial phase, we outlined our robot's requirements by selecting its primary mission and breaking it down into several Design Goals to facilitate implementation.
The mission, inspired by the article "Let's build a robot!", involves creating a robot capable of recognizing family members and functioning as a messenger and reminder. For instance, one could say, "Robot, remind (PersonName) to pick me up from the station at 6 pm." Even if the intended recipient's phone is on silent or they are otherwise occupied, the robot would navigate autonomously through the house, locate the individual, and deliver the message.
The specific Design Goals identified for this mission are:
- Design Goal 1: Implement camera-based face detection and recognition to identify individuals and display messages.
- Design Goal 2: Integrate facial expression recognition and speech synthesis capabilities for effective communication.
- Design Goal 3: Enable remote control of locomotion via keyboard and/or joystick.
- Design Goal 4: Integrate a laser range finder or similar sensor for navigation assistance.
- Design Goal 5: Achieve autonomous navigation capabilities using the ROS Navigation Stack.
- Design Goal 6: Implement task assignment and completion notification functionalities.
In the previous installment, we successfully integrated a spinning LIDAR and an IMU to fulfill Design Goal 4, enhancing navigation accuracy. In this article, we will utilize the ROS Navigation Stack to achieve autonomous locomotion for EaseRobot. This involves leveraging ROS packages for SLAM (Simultaneous Localization and Mapping), probabilistic localization systems, and global/local navigation planning to progress towards fulfilling Design Goal 5.
Autonomous Navigation Architecture
In ROS, a collection of packages can be combined to enable autonomous navigation. Although the concept of ROS stacks is outdated, the term "Navigation Stack" is still widely used. This refers to a set of packages that work together to facilitate robot navigation. In this tutorial, we will focus on configuring and launching existing ROS packages, rather than writing new code. It's essential to familiarize yourself with the configurable parameters of each package by consulting the ROS Wiki.
Environment Mapping
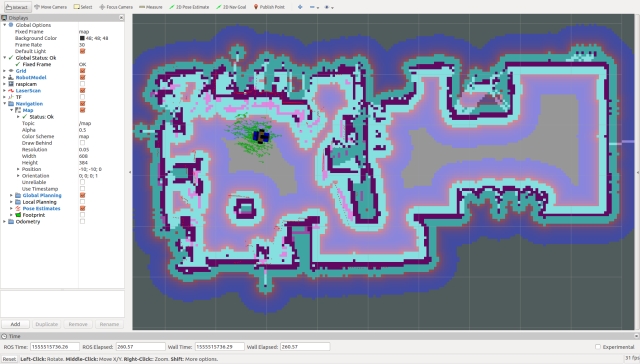
To navigate effectively, our robot needs a map of its surroundings. We'll use the gmapping package to create a map from sensor data recorded on a Linux workstation. Alternatively, you can run the node on the robot's hardware. Gmapping provides laser-based Simultaneous Localization and Mapping (SLAM) capabilities. The resulting map can be visualized in rviz, as shown below.
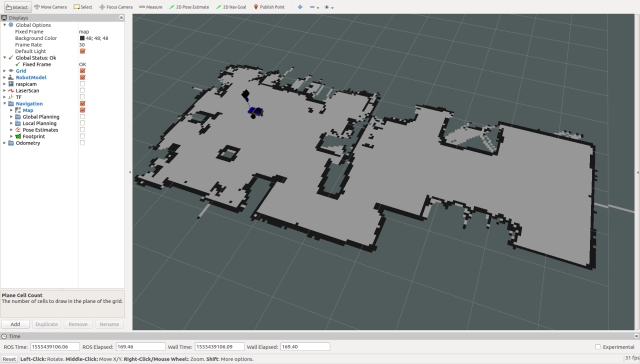
The map is stored in two files: a.yaml file and a.pgm file. You can edit the.pgm file using image editing tools to refine the map and restrict areas the robot should avoid.
While it's possible to create maps in real-time, most tutorials recommend recording sensor data and then generating the map from the recorded data. This approach allows you to experiment with different parameter settings. I prefer a hybrid approach, where you record data and visualize the map in rviz as it's created. This ensures you don't miss critical areas of the map.
To create the map, drive your robot slowly in manual mode, revisiting locations to improve map quality. I'll provide instructions on recording data and creating the map in the "Using the Code" section.
Once we have a map, the robot needs access to it. In ROS, this is achieved using topics. The map_server package provides the necessary nodes, including a latched topic that contains the map. This topic is not continually published, but rather passed to new nodes that require the map. The package also includes the map_saver node, which saves the map created by gmapping to disk.
To launch the map_server node on the robot hardware, we'll add the following code to the easerobot.launch file:
<arg name="map_file" default="second_floor"/>
<node pkg="map_server" type="map_server" name="map_server"
args="$(find easerobot)/maps/$(arg map_file).yaml" output="screen"/>
This implies that we'll store our map files in a new folder called maps within the easerobot package. If we don't provide a map_file parameter when calling the launch file, the default value of second_floor will be used.
Robot Localization: The Key to Navigation
To complete the navigation system, we need to enable our EaseRobot to determine its location and orientation in the environment. This process, known as robot localization, is crucial for the robot to understand its surroundings and make informed decisions. Since the odom and laser sensors are not perfect, the robot will maintain a list of possible locations, known as poses, and continually update and refine this list as it moves.
Introducing Adaptive Monte Carlo Localization (AMCL)
To achieve robot localization, we will utilize the amcl package, which stands for Adaptive Monte Carlo Localization. Fortunately, we only need to configure and launch the package, without delving into the intricacies of AMCL. For those interested in learning more, a good starting point is the Wikipedia page on AMCL.
Configuring the AMCL Node
As with most ROS packages, we will configure the amcl node by loading configuration data onto the parameter server. This data is stored in the amcl_config.yaml file, located in the EaseRobot/config folder. Below is an example of the configuration file, which can be customized to suit specific needs.
# Overall filter parameters
min_particles: 500
max_particles: 3000
kld_err: 0.05
kld_z: 0.99
update_min_d: 0.2
update_min_a: 0.5
resample_interval: 1
transform_tolerance: 0.5
recovery_alpha_slow: 0.0
recovery_alpha_fast: 0.0
gui_publish_rate: 1.0

# Laser model parameters
laser_max_beams: 30
laser_z_hit: 0.5
laser_z_short: 0.05
laser_z_max: 0.05
laser_z_rand: 0.5
laser_sigma_hit: 0.2
laser_lambda_short: 0.1
laser_likelihood_max_dist: 2.0
laser_model_type: likelihood_field

# Odometry model parameters
odom_model_type: diff
odom_alpha1: 0.2
odom_alpha2: 0.2
odom_alpha3: 0.8
odom_alpha4: 0.2
odom_alpha5: 0.1
odom_frame_id: odom
base_frame_id: base_footprint
Launching the AMCL Node
To launch the amcl node with the specified configuration, we will add the following code to the EaseRobot.launch file:
<node pkg="amcl" type="amcl" name="amcl" output="screen">
  <rosparam command="load" file="$(find EaseRobot)/config/amcl_config.yaml"/>
  </node>
Important Notes
It's worth noting that most of the parameter changes made to the nav stack relate to transform tolerances and sample frequencies. Given the complex calculations required, we need to ensure that the Raspberry Pi can handle these tasks efficiently.
Navigating Through the Environment
Now that we have a solid foundation, it's time to focus on the crux of the matter: planning a route for our EaseRobot to navigate from one point to another. To achieve this, we'll be utilizing the move_base package, which relies on data from various sources, including the map, odom, laser, and amcl. This package is responsible for plotting the most efficient route while adapting to changes in the environment, such as unexpected obstacles or moving objects.
Costmaps: The Key to Navigation
The move_base package employs two types of costmaps: global and local. A costmap is a visual representation of the environment, highlighting areas that are favorable or unfavorable for the robot to occupy. The global costmap is based on the static map and remains unchanged, providing a broad overview of the environment. In contrast, the local costmap is dynamic, updating in real-time as the robot moves, and focuses on the immediate surroundings.
Configuring the Planners
The move_base package supports various global and local planners, as long as they conform to the nav_core::BaseGlobalPlanner and nav_core::BaseLocalPlanner interfaces, respectively. This flexibility allows developers to create custom planners or utilize existing ones. In this case, we'll be using the global_planner and dwa_local_planner.
Configuration Files
To set up the move_base package, we'll create several configuration files, stored in the EaseRobot/config folder, which will be loaded into the parameter server. One such file is base_local_planner_params.yaml, which defines the parameters for the local planner, including controller frequency, planner selection, and various velocity and acceleration limits.
Tuning the Local Planner
The local planner's performance is highly dependent on the values assigned to its parameters. These values can be adjusted dynamically using dynamic reconfiguration, and their optimal settings vary depending on the robot's environment and characteristics. For instance, increasing the maximum speed and rotational velocity may seem beneficial, but it can lead to the robot getting stuck in tight spaces. It's essential to carefully calibrate these parameters to ensure smooth navigation.
Costmap Parameters
Both global and local costmaps share some common parameters, while others are specific to each type. Understanding these parameters is crucial for fine-tuning the navigation system to suit the EaseRobot's unique needs.
Deploying and Testing the Code
To test and deploy the code, I'll be using a Linux PC, referred to as the workstation, to handle the test tools and manual control nodes, while the code will run directly on the robot hardware.
Setting Up ROS Packages on the Raspberry Pi (Robot Hardware)
- Prepare the Workspace:
If you haven’t already set up a catkin workspace on the Raspberry Pi, follow these steps:
$ mkdir -p ~/ease_robot_ws/src
$ cd ~/ease_robot_ws/
$ catkin_make
- Add Packages:
Transfer the following ROS packages to the ~/ease_robot_ws/src directory on the Raspberry Pi:
face_recognition
face_recognition_msgs
head_control
imu_calib
pan_tilt
ease_robot
ease_robot_missions
ros-keyboard
rplidar-ros
servo_msgs
speech
tacho_msgs
thunderborg
- Build the Workspace:
Navigate to the workspace and build the packages:
$ cd ~/ease_robot_ws/
$ catkin_make
Ensure the build completes without any errors.
- Teensy Compilation:
Compile and upload the sketch to the Teensy 3.5 as per your project's requirements.
Setting Up ROS Packages on the Workstation
- Create the Workspace:
On the workstation, set up a new catkin workspace with the following commands:
$ mkdir -p ~/test_ws/src
$ cd ~/test_ws/
$ catkin_make
- Add Packages:
Place the following ROS packages into the ~/test_ws/src directory:
ease_robot
joystick
ros-keyboard
*Build the Workspace:
Change to the workspace directory and build the packages:
$ cd ~/test_ws/
$ catkin_make
Verify that the build completes without any errors.
Time-Saving Tips for ROS Command Entry
When managing ROS (Robot Operating System) on both your workstation and Raspberry Pi, you often find yourself typing the same commands repeatedly across different terminals. To streamline this process, consider these time-saving tips:
- Automate Command Execution on the Raspberry Pi:
To avoid typing source devel/setup.bash every time you open a new terminal session on the Raspberry Pi, you can automate this process by adding the command to your .bashrc file. Follow these steps:
$ cd ~/
$ nano .bashrc
Add the following line to the end of the .bashrc file:
source /home/ubuntu/ease_robot_ws/devel/setup.bash
Save the file and exit. This change ensures that the necessary ROS environment variables are set
automatically each time you start a new terminal session.
- Simplify Command Entry on the Workstation:
On your workstation, you can also streamline your workflow by defining an alias that sets up the ROS environment and specifies the ROS master URI. Add the following alias to your workstation's .bashrc file:
alias ease_robot='source ~/test_ws/devel/setup.bash; \
export ROS_MASTER_URI=http://ubiquityrobot:11311'
With this alias in place, you only need to type ease_robot in the terminal to execute both commands simultaneously, saving you from repetitive typing.
- Use TAB Completion for Efficiency:
Many ROS tools support TAB completion, which can speed up command entry. For example, if you type rosrun rosserial_ and press the TAB key, the terminal will automatically complete the command to rosrun rosserial_python if that is the only option. This feature helps to reduce errors and speeds up command entry.
By integrating these tips into your workflow, you'll enhance your productivity and make working with ROS more efficient.
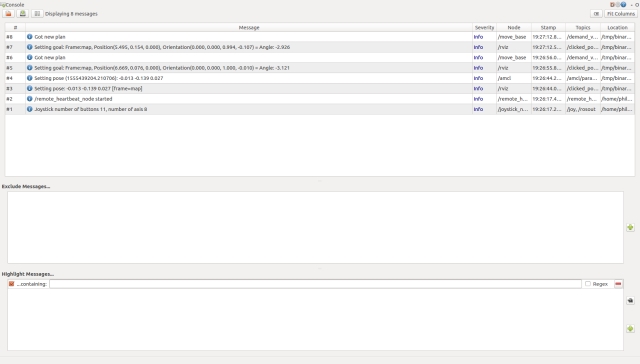
Monitoring EaseRobot's Log Files
As EaseRobot explores its surroundings, it's essential to keep track of its log messages. While these messages are displayed in the terminal where you launched the code, this isn't practical if the robot is moving around in a different room. To overcome this limitation, you can remotely monitor the log files from the control station using the following steps:
Set the ROS Master URI environment variable to point to the EaseRobot's ROS master node:
export ROS_MASTER_URI=http://ubiquityrobot:11311
Launch the ROS console tool:
rqt_console
This will allow you to view EaseRobot's log messages in real-time, even when it's operating in a different location.
Building a Map with EaseRobot
To begin, we'll start by launching the necessary nodes on the robot's hardware, excluding the navigation stack. Open a terminal and run the following commands:
$ source ease_robot_ws/devel/setup.bash
$ roslaunch ease_robot ease_robot.launch no_nav:=True
Next, switch to your workstation and launch the remote control nodes using the following commands:
$ source test_ws/devel/setup.bash
$ export ROS_MASTER_URI=http://ubiquityrobot:11311
$ roslaunch ease_robot remote.launch
You should now see a small window titled "ROS keyboard input". Make sure this window has focus when entering keyboard commands.
Now, let's record the transforms and laser scan messages to create a map from the recorded data. Open a new terminal and start recording with the following commands:
$ export ROS_MASTER_URI=http://ubiquityrobot:11311
$ rosbag record -O data.bag /scan /tf
To visualize the map creation process, we'll launch the slam_gmapping node. In a new terminal on your workstation, run the following commands:
$ export ROS_MASTER_URI=http://ubiquityrobot:11311
$ rosparam set slam_gmapping/xmax 10
$ rosparam set slam_gmapping/ymax 10
$ rosparam set slam_gmapping/xmin -10
$ rosparam set slam_gmapping/ymin -10
$ rosparam set slam_gmapping/delta 0.05
$ rosrun gmapping slam_gmapping
Alternatively, you can use the mapping_launch package, which includes a launch file called mapping.launch. This package is available in the Robotics-test-code folder.
In another terminal on your workstation, launch rviz using the following commands:
$ source test_ws/devel/setup.bash
$ export ROS_MASTER_URI=http://ubiquityrobot:11311
$ roslaunch ease_robot rviz.launch
Configure rviz as follows:
- Set the fixed frame to "map"
- Display the /scan topic as LaserScan
- Display the base_link as TF
- Display the /map topic as Map
Using the joystick and/or keyboard, enter manual mode, ensure the LIDAR motor is running, and manually drive the EaseRobot around its environment. Move slowly and visit each location at least twice. You should see the map being created in real-time on rviz.
Saving and Regenerating the Map with EaseRobot
Now that you've created a map, press Ctrl-C in the terminal running rosbag to stop recording messages.
Next, save the map visible in rviz to disk. With slam_gmapping still running, enter the following command in the terminal that was running rosbag:
$ rosrun map_server map_saver -f my_first_map
This will save two files: my_first_map.yaml and my_first_map.pgm.
If you'd like to regenerate the map from the rosbag file with different gmapping parameters, you can do so now. First, shut down all terminals and the robot. Then, restart your workstation and follow these steps:
- Regenerating the Map
Open a new terminal and start the ROS master:
$ roscore
In another terminal, set the required gmapping parameters using rosparam:
$ rosparam set use_sim_time true
$ rosrun gmapping slam_gmapping
In a third terminal, playback the recorded rosbag file:
$ rosbag play --clock data.bag
Sit back and let gmapping recreate the map. If you'd like, you can start rviz (without setting the ROS_MASTER_URI) and watch the map being created in real-time.
Once the playback is complete, save the new map to disk:
$ rosrun map_server map_saver -f my_second_map
Feel free to experiment with different gmapping configuration parameters and playback the recorded bag file to see how they affect the generated map.
Autonomous Navigation: Bringing EaseRobot to Life
Now, let's dive into the most exciting part of our project – autonomous navigation. To get started, we'll need to launch all the necessary nodes on the EaseRobot's hardware. You can use the default map, or specify your own by adding "map_file:=my_first_map" to the end of the roslaunch command.
On the EaseRobot's hardware, run the following commands:
$ source ease_ws/devel/setup.bash
$ roslaunch ease ease.launch
Next, on the workstation, run the following commands to start the remote control node:
$ source test_ws/devel/setup.bash
$ export ROS_MASTER_URI=http://ubiquityrobot:11311
$ roslaunch ease remote.launch
You should see a small window titled "ROS keyboard input" appear. Make sure to focus on this window when entering keyboard commands.
In another terminal on the workstation, launch rviz using the following commands:
$ source test_ws/devel/setup.bash
$ export ROS_MASTER_URI=http://ubiquityrobot:11311
$ roslaunch ease rviz.launch
Visualizing the Robot's Environment
Configure rviz to display the EaseRobot's model or base_link axis, laser scan, map, and pose estimates. Ensure that the map is set as the fixed frame.
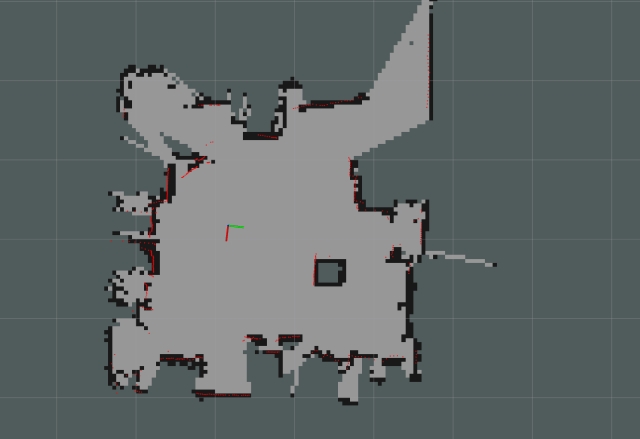
As we can see from the display, the laser scan doesn't align with the map, and the pose estimates are scattered. Before we can give the EaseRobot a navigational goal, we need to improve its localization.
The image below shows the EaseRobot's poor localization. The red lines represent the laser scan, while the green arrows indicate the pose estimates.
Our first task is to improve the EaseRobot's localization using rviz. To do this, click the "2D Pose Estimate" button and estimate the robot's real location and pose. Then, click and drag the large green arrow on the map to set the initial pose. Repeat this process until the laser scan aligns with the map.
Now that we have a good initial pose, let's refine the pose estimates by driving the EaseRobot around in manual mode. A good maneuver to try is spinning on the spot. As you move the robot, you should see the pose estimates converging on the robot's position.
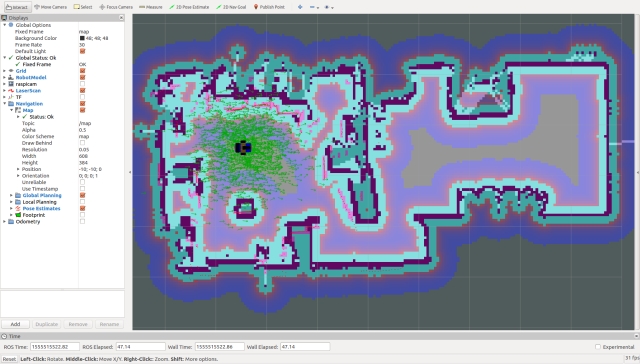
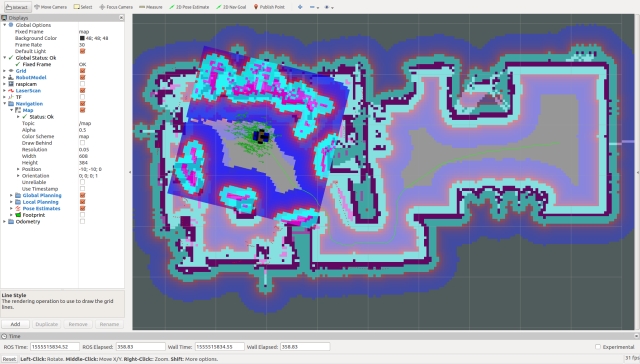
Next, we'll set a navigation goal for the EaseRobot. But first, let's take a look at the costmaps that will be used for planning the route. In rviz, select Global Planning to display the Global Costmap. I recommend selecting "Draw Behind" to wash out the map behind the main map.
The costmap shows the open spaces the planner will try to use and the riskier areas, such as up against a wall.
The Global Costmap is constructed from the main map and will be used to plan an ideal route. However, the actual movement of the EaseRobot will be governed by the Local Costmap, which will be generated on the fly as sensor data arrives. This allows the robot to avoid objects that weren't present when the map was created, such as a sleeping pet.
Select Local Planning in rviz to display the Local Costmap. I prefer to superimpose this map on top of the main map.
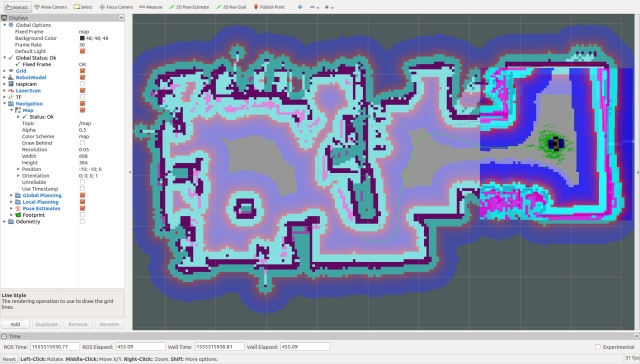
Now, set the target goal pose by clicking the "2D Nav Goal" button and clicking/dragging the large green arrow on the map to set the goal. Note that I've left the EaseRobot in manual mode, so it won't move yet. This gives us a chance to examine the global plan, shown as a thin green line in the image below.
To put the EaseRobot into autonomous mode, give the ROS keyboard input window focus and press the "1" key (not on the numeric keypad). This requests the robot to run mission 1, which is currently empty, so it will take the robot out of manual mode and allow the navigation stack to generate velocities that will be sent to the motor controller.
With any luck, the EaseRobot will navigate to the goal pose, and you can monitor its progress on rviz. In the image below, the robot has arrived at the goal.
I've noticed that after setting multiple poses to move to, the navigation stack sometimes fails to calculate a route, despite a clear path on the costmaps. To clear this issue, run the following command on the workstation:
$ rosservice call /move_base/clear_costmaps
Summary
In this segment, we've successfully integrated autonomous navigation capabilities into EaseRobot.
In our upcoming article, we'll delve into the process of programmatically setting navigation objectives and incorporating facial recognition functionality into a mission. This will enable EaseRobot to roam freely around the house, searching for the intended recipient of the message.