The EaseRobot Series 4: Building an Autonomous House Bot with ROS
Introduction
Welcome to the fourth part of our EaseRobot project series, where we're designing and building an autonomous house bot using the Robot Operating System (ROS). In this installment, we'll introduce a state machine package and develop two nodes to control the robot's missions and tasks.
Background
In our previous articles, we defined the requirements for our EaseRobot project and broke down our first mission into manageable design goals. Our mission, inspired by the "Let's build a robot!" article, is to create a robot that can take messages to family members.
The design goals for this mission are:
- Visual Recognition: Use the camera to search for faces, identify people, and display a message for recognized individuals.
- Facial Expressions and Speech Synthesis: Enable the EaseRobot to deliver messages with facial expressions and speech synthesis.
- Remote Control: Control the robot's locomotion using a remote keyboard and/or joystick.
- Sensor Integration: Add a laser ranger finder or similar ranging sensor to aid navigation.
- Autonomous Locomotion: Enable the EaseRobot to move independently.
- Task Management: Assign and notify tasks to the EaseRobot.
In our previous articles, we completed Design Goals 1 and 2. In this installment, we'll introduce a state machine package and develop two nodes to control the robot's missions and tasks, bringing us closer to achieving our design goals.
A Sophisticated Plan for EaseRobot
Introducing SMACH
As we prepare to integrate our design goals, we'll need a complex system to orchestrate and control the various components of EaseRobot. To achieve this, we'll utilize SMACH, a ROS Python library that enables the development of hierarchical state machines. The SMACH package documentation is available on the ROS Wiki website.
Unifying Design Goals 1 and 2
Although our ultimate objective is Mission 1, we'll start by combining Design Goals 1 and 2 into a smaller mission, Mission 2. This mission will focus on searching for recognized faces within the head movement range and speaking a greeting to anyone the robot recognizes. The processes developed for Mission 2 will later be incorporated into Mission 1.
To complete Mission 2, we'll create two nodes: ease_robot_missions and ease_robot. The ease_robot_missions node will contain the code for the state machine, managing missions and jobs. The ease_robot node will control when missions and jobs are initiated. We'll also add functionality for reading keyboard and game controller inputs, which will be used in Design Goal 3.
Introducing Jobs
In addition to missions, we'll introduce the concept of "jobs," which are tasks the robot needs to perform that are less complex than full missions. The node running the state machines is the ideal place for these jobs, as they may require the same resources as the more complex missions.
EaseRobot State Machine
We'll begin with the package and node containing the state machine that controls EaseRobot's missions and jobs. Since SMACH is a Python library, our package will be written in Python.
Our ROS package for the node is called ease_robot_missions and is available in the ease_robot_missions folder. The src folder contains the ease_robot_missions_node.py file, which holds the main code for the node. The src folder also contains a subfolder called missions_lib, where each of EaseRobot's missions will result in a Python file. We'll focus on Mission 2, with the code located in the greet_all.py file.
The ease_robot_missions_node.py file will contain code to register the node, helper functions, and the high-level state machine that accepts each mission and job. The greet_all.py file will contain the sub-state machine for Mission 2. As we add new missions to EaseRobot, we'll create sub-state machines for each mission.
The diagram below illustrates our current state machine.
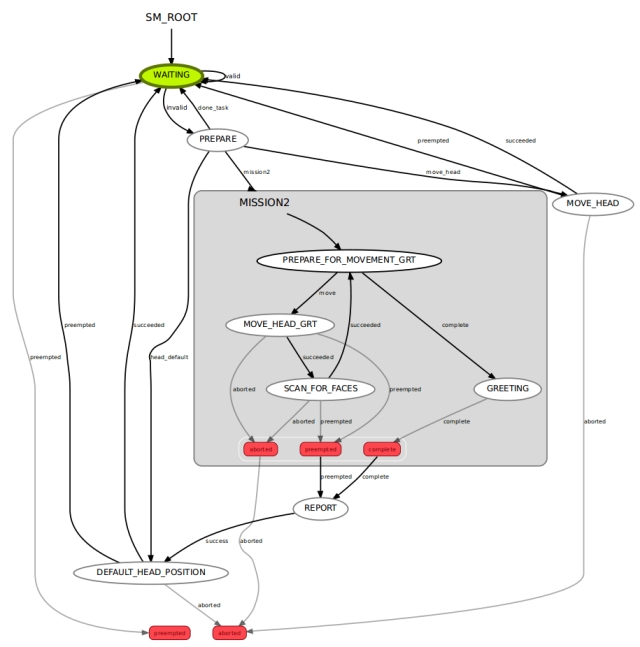
In this section, we'll delve into the intricacies of the EaseRobot state machine, which is responsible for managing the robot's missions and jobs.
WAITING State
The WAITING state is a specialized MonitorState that continuously monitors the /missions/mission_request topic. When a message is received, it extracts the request and associated parameters, then transitions to the PREPARE state, passing on the request data.
PREPARE State
The PREPARE state handles 'Job' requests, which may involve transitioning to the MOVE_HEAD, DEFAULT_HEAD_POSITION, or WAITING states. If the request is to execute Mission 2, it transitions to the MISSION2 sub-state machine.
MOVE_HEAD State
The MOVE_HEAD state is a SimpleActionState that sends a request to move the head/camera to a specified position. Once the move is complete, it transitions to the WAITING state.
DEFAULT_HEAD_POSITION State
The DEFAULT_HEAD_POSITION state is also a SimpleActionState, but it only moves the head/camera to the default position. Once the move is complete, it transitions to the WAITING state.
REPORT State
The REPORT state sends a mission complete message on the /missions/mission_complete topic and transitions to the DEFAULT_HEAD_POSITION state.
PREPARE_FOR_MOVEMENT_GRT State
This state calculates the next head position and determines if there are still scans to be done. If so, it transitions to the MOVE_HEAD_GRT state; otherwise, it transitions to the GREETING state.
MOVE_HEAD_GRT State
The MOVE_HEAD_GRT state is a SimpleActionState that requests the head/camera to move to the calculated position, then transitions to the SCAN_FOR_FACES state.
SCAN_FOR_FACES State
The SCAN_FOR_FACES state is a SimpleActionState that requests a scan for known faces in the current camera image. If faces are recognized, the names are stored for later use, and the state transitions to the PREPARE_FOR_MOVEMENT_GRT state.
GREETING State
The GREETING state requests a greeting to be spoken for all recognized individuals, then transitions to the REPORT state.
/missions/mission_request Topic The /missions/mission_request topic contains a string message with an ID for the Mission or Job, followed by zero or more parameters separated by the '^' character.
Currently, the IDs and parameters are as follows:
- "M2" - Request to conduct Mission 2 (no parameters)
- "J1" - Request to conduct Job 1 (parameters: wav file name and matching text)
- "J2" - Request to conduct Job 2 (parameters: text to speak and matching text)
- "J3" - Request to conduct Job 3 (parameters: head movement direction and camera position)
The Code
We'll now explore the code, starting with the ease_robot_missions_node.py file, which contains the main function, the top-level state machine class, state classes, and a helper function class used by the various states.
The primary function registers our node with ROS and creates an instance of the EaseRobotMissionsNode class.
def main(args):
    rospy.init_node('ease_robot_missions_node', anonymous=False)
    rospy.loginfo("EaseRobot missions node started")
    erm = EaseRobotMissionsNode()
The class constructor for EaseRobotMissionsNode sets up to call ShutdownCallback if the node is shutdown. It then subscribes to the /missions/mission_cancel topic, supplying the callback CancelCallback. Next, it creates an instance of the helper class. It then creates the states of the top-level state machine and adds them to the state machine. At this level, the MISSION 2 sub-state machine is a single state in our top-level state machine.
We then create and start an introspective server. This is not required for the robot to operate but allows you to run a tool called smach_viewer. This tool can help to debug any problems with your state machine and was used to automatically produce the state machine diagram above.
The constructor then starts the execution of the state machine and hands control over to ROS.
There are three other functions in the EaseRobotMissionsNode class.
- MissionsRequestCB is the function called by the MonitorState WAITING when a message is received on the /missions/mission_request topic. This extracts the data from the message and copies it to userdata, which is a process for passing data between states. It then returns False so that the state machine will transit to the PREPARE state.
- CancelCallback is the callback function called if a message is received on the /missions/mission_cancel topic. This will result in the pre-emption of our lower state machine if it is running.
- ShutdownCallback is the callback function called if the node receives a command from ROS to shutdown.
# Top level state machine. The work for each mission is another state machine
# in the 'mission' states
class EaseRobotMissionsNode:
    def __init__(self):
        rospy.on_shutdown(self.ShutdownCallback)

        # Subscribe to message to cancel missions
        self.__cancel_sub = rospy.Subscriber('/missions/mission_cancel', Empty,
                                             self.CancelCallback)

        # Create an instance of the missions helper class
        self.__missions_helper = MissionsHelper()

        # ------------------------- Top level state machine -------------------------
        # Create top level state machine
        self.__sm = StateMachine(outcomes=['preempted','aborted'],
                                 output_keys=['mission_data'])
        with self.__sm:
            # Add a state which monitors for a mission to run
            StateMachine.add('WAITING',
                             MonitorState('/missions/mission_request',
                             String,
                             self.MissionRequestCB,
                             output_keys = ['mission']),
                             transitions={'valid':'WAITING', 'invalid':'PREPARE',
                                          'preempted':'preempted'})

            # Add state to prepare the mission
            StateMachine.add('PREPARE',
                             Prepare(self.__missions_helper),
                             transitions={'mission2':'MISSION2',
                                          'done_task':'WAITING',
                                          'head_default':'DEFAULT_HEAD_POSITION',
                                          'move_head':'MOVE_HEAD'})

            # Add the reporting state
            StateMachine.add('REPORT',
                             Report(),
                             transitions={'success':'DEFAULT_HEAD_POSITION'})

            # Set up action goal for deafult head position
            default_position_pan, default_position_tilt =
                                  self.__missions_helper.CameraDefaultPos()
            head_goal = point_headGoal()
            head_goal.absolute = True
            head_goal.pan = default_position_pan
            head_goal.tilt = default_position_tilt

            # Add the default camera position state.
            # Which moves the head to the default position
            StateMachine.add('DEFAULT_HEAD_POSITION',
                             SimpleActionState('head_control_node',
                                               point_headAction,
                                               result_cb =
                                               self.__missions_helper.CameraAtDefaultPos,
                                               goal = head_goal),
                             transitions={'succeeded':'WAITING','preempted':'WAITING',
                                          'aborted':'aborted'})

            # Add the move head state
            StateMachine.add('MOVE_HEAD',
                             SimpleActionState('head_control_node',
                                               point_headAction,
                                               goal_slots=['absolute', 'pan', 'tilt']),
                             transitions={'succeeded':'WAITING', 'preempted':'WAITING',
                                          'aborted':'aborted'},
                             remapping={'absolute':'user_data_absolute', 'pan':'user_data_pan',
                                        'tilt':'user_data_tilt'})

            # ------------------------- Sub State machine for mission 2 ---------------------
            # Create a sub state machine for mission 2 - face detection and greeting
            self.__sm_mission2 = missions_lib.Mission2StateMachine(self.__missions_helper)

            # Now add the sub state machine for mission 2 to the top level one
            StateMachine.add('MISSION2',
                             self.__sm_mission2,
                             transitions={'complete':'REPORT','preempted':'REPORT',
                                          'aborted':'aborted'})
            # -------------------------------------------------------------------------------

        # Create and start the introspective server so that we can use smach_viewer
        sis = IntrospectionServer('server_name', self.__sm, '/SM_ROOT')
        sis.start()

        self.__sm.execute()

        # Wait for ctrl-c to stop application
        rospy.spin()
        sis.stop()

    # Monitor State takes /missions/mission_request topic and passes the mission
    # in user_data to the PREPARE state
    def MissionRequestCB(self, userdata, msg):
        # Take the message data and send it to the next state in the userdata
        userdata.mission = msg.data

        # Returning False means the state transition will follow the invalid line
        return False

    # Callback for cancel mission message
    def CancelCallback(self, data):
        # If a sub statemachine for a mission is running then request it be preempted
        if self.__sm_mission2.is_running():
            self.__sm_mission2.request_preempt()

    def ShutdownCallback(self):
        self.__sm.request_preempt()
        # Although we have requested to shutdown the state machine
        # it will not happen if we are in WAITING until a message arrives
the PREPARE and REPORT states are encapsulated within separate classes in the EaseRobot_missions_node.py file.
The Prepare class is designed with a constructor that defines the subsequent state following PREPARE, specifies the data to be passed to it, and stores an instance of the helper class.
Upon entering the state, the execute function is triggered, which examines the request message, executes any feasible jobs, and subsequently transitions to the WAITING state or redirects to another state to execute the job or mission.
# The PREPARE state
class Prepare(State):
    def __init__(self, helper_obj):
        State.__init__(self, outcomes=['mission2','done_task','head_default','move_head'],
                       input_keys=['mission'],
                       output_keys=['mission_data','start',
                       'user_data_absolute','user_data_pan','user_data_tilt'])
        self.__helper_obj = helper_obj

    def execute(self, userdata):
        # Based on the userdata either change state to the required mission or
        # carry out single job userdata.mission contains the mission or single
        # job and a number of parameters seperated by '^'
        retVal = 'done_task';

        # Split into parameters using '^' as the delimiter
        parameters = userdata.mission.split("^")

        if parameters[0] == 'M2':
            # Mission 2 is scan for faces and greet those known, there are no
            # other parameters with this mission request
            userdata.start = True
            retVal = 'mission2'
        elif parameters[0] == 'J1':
            # Simple Job 1 is play a supplied wav file and move the face lips
            # Publish topic for speech wav and robot face animation
            self.__helper_obj.Wav(parameters[1], parameters[2])
        elif parameters[0] == 'J2':
            # Simple Job 2 is to speak the supplied text and move the face lips
            # Publish topic for speech and robot face animation
            self.__helper_obj.Speak(parameters[1], parameters[2])
        elif parameters[0] == 'J3':
            # Simple Job 3 is to move the head/camera. This command will only
            # be sent in manual mode.
            # parameters[1] will either be 'u', 'd', 'c' or '-'
            # parameters[2] will either be 'l', 'r' or '-'
            # Check for return to default command
            if 'c' in parameters[1]:
                retVal = 'head_default'
            else:
                relative_request_pan, relative_request_tilt =
                         self.__helper_obj.CameraManualMove(parameters[1]+parameters[2])
                # Set up user data that will be used for goal in next state
                userdata.user_data_absolute = False # This will be a relative move
                userdata.user_data_pan = relative_request_pan
                userdata.user_data_tilt = relative_request_tilt
                retVal = 'move_head'

        return retVal
The Report class is designed to facilitate the REPORT state, which is responsible for publishing a message on the /missions/mission_complete topic upon completion of a mission.
The class constructor initializes the REPORT state, specifying the outcome as'success' and establishing a publisher for the /missions/mission_complete topic.
When the REPORT state is entered, the execute function is triggered, publishing a message indicating that the mission has been completed.
class Report(State):
def init(self):
State.init(self, outcomes=['success'])
self.publisher = rospy.Publisher('/missions/mission_complete', String, queue_size=5)

def execute(self, userdata):
    # Publishes message signaling mission completion
    self.publisher.publish("Mission Complete")
    return'success'
The EaseRobot_missions_node.py file also includes the MissionHelper class, which serves as a utility class for various missions. This class provides reusable code for the sub-state machines, eliminating the need for code duplication. The functions within this class enable communication with the voice and robot face nodes, as well as calculating the next position of the head/camera.
# Helper class to hold code used by serveral different states
class MissionsHelper():
    def __init__(self):
        self.__speech_pub_ = rospy.Publisher('/speech/to_speak', voice, queue_size=1)
        self.__text_out_pub = rospy.Publisher('/robot_face/text_out', String, queue_size=1)

        # Obtain values from the parameter server
        # Minium/Maximum range movment of camera
        self.__pan_min = rospy.get_param("/servo/index0/pan/min", -(pi/2.0))
        self.__pan_max = rospy.get_param("/servo/index0/pan/max", pi/2.0)
        self.__tilt_min = rospy.get_param("/servo/index0/tilt/min", -(pi/2.0))
        self.__tilt_max = rospy.get_param("/servo/index0/tilt/max", pi/2.0);
        # Default position after mission ends
        self.__camera_default_pan_position = rospy.get_param("/head/position/pan", 0.0)
        self.__camera_default_tilt_position = rospy.get_param("/head/position/tilt", 0.0)
        # Step value to move the camera by when searching
        self.__pan_step_value = rospy.get_param("/head/view_step/pan", 0.436332)
        self.__tilt_step_value = rospy.get_param("/head/view_step/tilt", 0.436332)
        # Step value to move the camera in manual mode
        self.__manual_pan_step_value = rospy.get_param("/head/manual_view_step/pan", 0.174533)
        self.__manual_tilt_step_value = rospy.get_param("/head/manual_view_step/tilt", 0.174533)

        # When true and scanning pan angle will increase, otherwise decrease
        self.__increase_pan = True

        # Position that will be requested to move the head/camera to
        self.__position_request_pan = self.__camera_default_pan_position
        self.__position_request_tilt = self.__camera_default_tilt_position

    def Speak(self, text_to_speak, text_to_display):
        voice_msg = voice()
        voice_msg.text = text_to_speak
        voice_msg.wav = ""

        # Publish topic for speech and robot face animation
        self.__speech_pub_.publish(voice_msg)
        self.__text_out_pub.publish(text_to_display)

    def Wav(self, wav_file, text_to_display):
        voice_msg = voice()
        voice_msg.text = ""
        voice_msg.wav = wav_file

        # Publish
        self.__speech_pub_.publish(voice_msg)
        self.__text_out_pub.publish(text_to_display)

    # Function to return the camera start position when scanning within head movement range
    def CameraToStartPos(self):
        # Set the camera position to pan min and tilt min
        self.__position_request_pan = self.__pan_min
        self.__position_request_tilt = self.__tilt_max
        # Set the variable that says which direction the pan is going. Start by incrementing
        self.__increase_pan_ = True
        return self.__position_request_pan, self.__position_request_tilt

    # Function to keep track of position after action to set to default position
    def CameraAtDefaultPos(self, userdata, status, result):
        if status == GoalStatus.SUCCEEDED:
            self.__position_request_pan = self.__camera_default_pan_position
            self.__position_request_tilt = self.__camera_default_tilt_position

    # Function returns camera default position
    def CameraDefaultPos(self):
        return self.__camera_default_pan_position, self.__camera_default_tilt_position

    # Function to return the next position when scanning within the head movement range.
    # Also returns indication if all areas scanned or more left
    def CameraToNextPos(self):
        all_areas_scanned = False
        # Calculate the next position of the head/camera
        if self.__increase_pan == True:
            if self.__position_request_pan == self.__pan_max:
                # Last scan was at the edge, move tilt up and then pan the other way
                self.__increase_pan = False
                self.__position_request_tilt -= self.__tilt_step_value

                if self.__position_request_tilt < self.__tilt_min:
                    all_areas_scanned = True
            else:
                self.__position_request_pan += self.__pan_step_value

                if self.__position_request_pan > self.__pan_max:
                    # Moved out of range, put back on max
                    self.__position_request_pan = self.__pan_max
        else:
            if self.__position_request_pan == self.__pan_min:
                # Last scan was at the edge, move tilt up and then pan the other way
                self.__increase_pan = True
                self.__position_request_tilt -= self.__tilt_step_value

                if self.__position_request_tilt < self.__tilt_min:
                    all_areas_scanned = True
            else:
                self.__position_request_pan -= self.__pan_step_value

                if self.__position_request_pan < self.__pan_min:
                    # Moved out of range, put back on min
                    self.__position_request_pan = self.__pan_min

        if all_areas_scanned == True:
            # Reset camera/head position to default values
            self.__position_request_pan = self.__camera_default_pan_position
            self.__position_request_tilt = self.__camera_default_tilt_position

        return all_areas_scanned, self.__position_request_pan, self.__position_request_tilt

    def CameraManualMove(self, direction):
        relative_request_pan = 0.0
        relative_request_tilt = 0.0
        # Check for up command
        if 'd' in direction:
            relative_request_tilt = self.__manual_tilt_step_value
            if (self.__position_request_tilt + relative_request_tilt) > self.__tilt_max:
                # Would move out of range so move to the max position
                relative_request_tilt = self.__tilt_max - self.__position_request_tilt
                self.__position_request_tilt = self.__tilt_max
            else:
                # Keep track
                self.__position_request_tilt += relative_request_tilt

        # Check for down command
        if 'u' in direction:
            relative_request_tilt = -(self.__manual_tilt_step_value)
            if (self.__position_request_tilt + relative_request_tilt) < self.__tilt_min:
                # Would move out of range so move to the min position
                relative_request_tilt = self.__tilt_min - self.__position_request_tilt
                self.__position_request_tilt = self.__tilt_min
            else:
                # Keep track
                self.__position_request_tilt += relative_request_tilt

        # Check for left commnand
        if 'l' in direction:
            relative_request_pan = self.__manual_pan_step_value
            if (self.__position_request_pan + relative_request_pan) > self.__pan_max:
                # Would move out of range so move to the max
                relative_request_pan = self.__pan_max - self.__position_request_pan
                self.__position_request_pan = self.__pan_max
            else:
                # Keep track
                self.__position_request_pan += relative_request_pan

        # Check for right command
        if 'r' in direction:

            relative_request_pan = -(self.__manual_pan_step_value)
            if (self.__position_request_pan + relative_request_pan) < self.__pan_min:
                # Would move out of range so so move to min
                relative_request_pan = self.__pan_min - self.__position_request_pan
                self.__position_request_pan = self.__pan_min
            else:
                # Keep track
                self.__position_request_pan += relative_request_pan

        return relative_request_pan, relative_request_tilt
the missions_lib subfolder serves as a repository for sub-state machines dedicated to various missions. Currently, the mission 2 sub-state machine is implemented in the greet_all.py file.
The primary class in this file is Mission2StateMachine, which inherits from the StateMachine parent class. The constructor initializes the sub-state machine, stores an instance of the helper class, and creates each state that comprises this sub-state machine. Additionally, the class features a callback function that is triggered when the face recognition action returns its result, enabling seamless integration with the mission workflow.
# Child (derived) class. Parent class is StateMachine
class Mission2StateMachine(StateMachine):
    def __init__(self, helper_obj):
        StateMachine.__init__(self, outcomes=['complete','preempted','aborted'],
                              input_keys=['start'])

        self.__helper_obj = helper_obj

        with self:
            # This state will calculate the next head/camera position
            StateMachine.add('PREPARE_FOR_MOVEMENT_GRT',
                             PrepareMovementGeeting(self.__helper_obj),
                             transitions={'complete':'GREETING','move':'MOVE_HEAD_GRT'},
                             remapping={'start_in':'start','start_out':'start'})

            # This state will call the action to move the head/camera
            StateMachine.add('MOVE_HEAD_GRT',
                             SimpleActionState('head_control_node',
                                               point_headAction,
                                               goal_slots=['absolute','pan','tilt']),
                             transitions={'succeeded':'SCAN_FOR_FACES',
                                          'preempted':'preempted','aborted':'aborted'},
                             remapping={'absolute':'user_data_absolute',
                                        'pan':'user_data_pan','tilt':'user_data_tilt'})

            # This state will call the action to scan for faces on the image from the camera
            StateMachine.add('SCAN_FOR_FACES',
                             SimpleActionState('face_recognition',
                                               scan_for_facesAction,
                                               result_cb=self.face_recognition_result_cb,
                                               input_keys=['seen_dict_in'],
                                               output_keys=['seen_dict_out']),
                              remapping={'seen_dict_in':'seen_dict',
                                         'seen_dict_out':'seen_dict'},
                              transitions={'succeeded':'PREPARE_FOR_MOVEMENT_GRT',
                                           'preempted':'preempted','aborted':'aborted'})

            StateMachine.add('GREETING',
                             Greeting(self.__helper_obj),
                             transitions={'complete':'complete'})

    def face_recognition_result_cb(self, userdata, status, result):
        if status == GoalStatus.SUCCEEDED:
            # Face recognition action complete
            local_dict = userdata.seen_dict_in
            if len(result.ids_detected) > 0:
                # Recognised faces detected. Have we seen them before or are they new
                for idx, val in enumerate(result.ids_detected):
                    if val not in local_dict:
                        # Add to dictionary
                        local_dict[val] = result.names_detected[idx]

                        # Log who was seen
                        rospy.loginfo("Greeting: I have seen %s", result.names_detected[idx])

                # Update disctionary stored in user data
                userdata.seen_dict_out = local_dict

        # By not returning anything the state will return with the
        # corresponding outcome of the action
Furthermore, the greet_all.py file encompasses two additional classes that constitute the core of the PREPARE_FOR_MOVEMENT_GRT and GREETING states, respectively. These classes play a vital role in orchestrating the mission's workflow, ensuring a seamless transition between states.
# PREPARE_FOR_MOVEMENT_GRT State
class PrepareMovementGeeting(State):
    def __init__(self, helper_obj):
        State.__init__(self, outcomes=['complete','move'],
                       input_keys=['start_in'],
                       output_keys=['start_out','seen_dict',
                       'user_data_absolute','user_data_pan','user_data_tilt'])
        self.__helper_obj = helper_obj

    def execute(self, userdata):
        # Is this the start of a new mission
        if userdata.start_in == True:
            userdata.start_out = False
            # clear the seen dictionary
            userdata.seen_dict = {}
            scan_complete = False
            # get the camera start position (pan min and tilt max)
            position_request_pan,  position_request_tilt =
                                   self.__helper_obj.CameraToStartPos()
        else:
            scan_complete, position_request_pan, position_request_tilt =
                                                 self.__helper_obj.CameraToNextPos()

        # Set up user data that will be used for goal in next state if not complete
        userdata.user_data_absolute = True
        userdata.user_data_pan = position_request_pan
        userdata.user_data_tilt = position_request_tilt

        if scan_complete == True:
            next_outcome = 'complete'
        else:
            next_outcome = 'move'

        return next_outcome

# Greeting State
class Greeting(State):
    def __init__(self, helper_obj):
        State.__init__(self, outcomes=['complete'],
                       input_keys=['seen_dict'])
        self.__helper_obj = helper_obj

    def execute(self, userdata):
        # userdata.seen_dict contains a dictionary of ids and names seen
        # Construct greeting
        greeting = ''
        if len(userdata.seen_dict) == 0:
            greeting = 'No one recognised'
        else:
            greeting = 'Hello '
            for id, name in userdata.seen_dict.items():
                greeting += name + ' '

            greeting += 'how are you '

            if len(userdata.seen_dict) == 1:
                greeting += 'today'
            elif len(userdata.seen_dict) == 2:
                greeting += 'both'
            else:
                greeting += 'all'

        rospy.loginfo(greeting)

        # Speak greeting
        self.__helper_obj.Speak(greeting, greeting + ':)')

        return 'complete'
As the EaseRobot project continues to evolve, we will adopt a modular approach to incorporating new missions, where each mission will be represented by a sub-state machine added to the missions_lib library. This template-based methodology will enable efficient expansion and maintenance of the project's capabilities.
Top Level Control
The EaseRobot node is responsible for the top-level control of the robot.
Our ROS package for the node is called ease_robot and is available in the ease_robot folder. The package contains all the usual ROS files and folders, plus a few extra.
The config folder contains a config.yaml file that can be used to override some of the default configuration values. You can configure:
- the game controller axis used for moving the robot forward and backward in manual locomotion mode
- the game controller axis used for moving the robot clockwise and anti-clockwise in manual locomotion mode
- the game controller axis used for moving the head/camera up and down in manual locomotion mode
- the game controller axis used for moving the head/camera left and right in manual locomotion mode
- the game controller button used for selecting manual locomotion mode
- the game controller button used for moving the head/camera back to the default position
- the game controller axes dead zone value
- the linear velocity requested when the controller axis is at its maximum range
- the angular velocity requested when the controller axis is at its maximum range
- the ramp rate used to increase or decrease the linear velocity
- the ramp rate used to increase or decrease the angular velocity
- the battery voltage level that a low battery warning will be issued at
- enable/disable the wav file playback functionality when the robot is inactive
- a list of wav filenames to play from when the robot is inactive
- A list of speeches to use when playing the wav filesnames
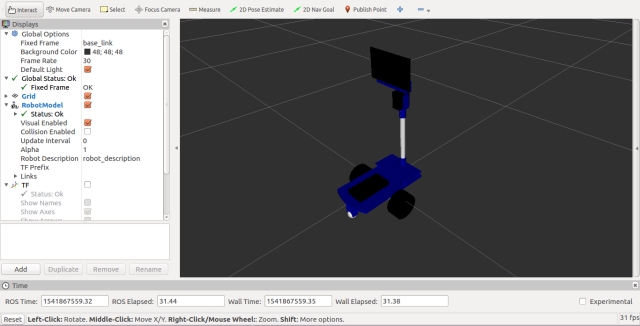
The launch folder contains two launch files, ease_robot.launch and rviz.launch. The ease_robot.launch file is used to load all the configuration files, covered in the first four articles, into the parameter server and to start all the nodes that make up the robot project. It is similar to the launch files used so far in the project, except it now includes the ease_robot_node and the ease_robot_missions_node. rviz is a 3D visualization tool for ROS that can be used to visualize data, including the robot position and pose. Documentation for rviz is available on the ROS Wiki website. The rviz.launch file, along with the meshes, rviz, and urdf folders, can be used for visualizing EaseRobot. We will use the urdf model of EaseRobot to do some testing on a simulated EaseRobot robot.
The image below shows a visualization of EaseRobot in rviz.
The ease_robot_control folder is just a convenient place to store the Arduino file that was discussed in Part 1.
The sounds folder is used to hold any wav files that the system is required to play. How to play these files and at the same time animate the robot face was covered in Part 3.
The include/ease_robot and src folders contain the C++ code for the package. For this package, we have one C++ class, EaseRobotNode, and a main routine contained within the ease_robot_node.cpp file.
The main routine informs ROS of our node, creates an instance of the node class, and passes it the node handle.
Again, we are going to do some processing of our own in a loop, so instead of passing control to ROS with a call to ros::spin, we are going to call ros::spinOnce to handle the transmitting and receiving of the topics. The loop will be maintained at a rate of 20Hz, which is set up by the call to ros::rate, and the timing is maintained by the call to r.sleep within the loop.
Our loop will continue while the call to ros::ok returns true, it will return false when the node has finished shutting down, e.g., when you press Ctrl-c on the keyboard.
In the loop, we will call checkTimers and sendTwist, which are described later in the article:
int main(int argc, char **argv)
{
ros::init(argc, argv, "ease_robot");
ros::NodeHandle n;
EaseRobotNode ease_robot_node(n);
std::string node_name = ros::this_node::getName();
ROS_INFO("%s started", node_name.c_str());

ros::Rate r(20); // 20Hz

while(ros::ok())
{
    ease_robot_node.sendTwist();
    ease_robot_node.checkTimers();

    ros::spinOnce();
    r.sleep();
}

return 0;

}
The constructor for our class starts by setting default values for the class parameters. For each of the parameters which are configurable using the ROS parameter server, a call is made to either param or getParam. The difference between these two calls is that with param, the default value passed to the call is used if the parameter is not available in the parameter server.
We next subscribe to the topics that the node is interested in.
- keyboard/keydown - to obtain key presses from a keyboard. These key presses are generated from a remote PC to control the robot in manual mode
- joy - to obtain joystick/game pad controller input, again to control the robot from a remote PC
- missions/mission_complete - so that the node is informed when the current robot mission is completed
- main_battery_status - this will be used later in the project to receive the state of the robots main battery
- demand_vel - this will be used later in the project to receive autonomous velocity demands
Next in the constructor is the advertisement of the topics which this node will publish.
- /robot_face/expected_input - This topic was discussed in part 3 of these articles and is used to display a status below the robot face. We will use it to show the status of the main battery
- /missions/mission_request - This will be used to pass requested missions and jobs on to the state machine node.
- /missions/mission_cancel - This can be used to cancel the current ongoing mission.
- /missions/mission_acknowledge - This will be used later in the project to acknowledge that part of a mission is complete and to continue with the rest of the mission.
- /cmd_vel - This will be used later in the project to send velocity commands to the node responsible for driving the electric motors. The requested velocities will either be from the autonomous subsystem or as a result of keyboard/joystick requests when in manual mode.
- /commands/reset_odometry - This will be used later in the project to reset the robot odometry values.
Finally, the constructor sets a random generator seed and obtains the current time. The use of the random number generator and the time is discussed in the section on the checkTimers method.
// Constructor
EaseRobotNode::EaseRobotNode(ros::NodeHandle n)
{
    nh_ = n;

    joystick_linear_speed_ = 0.0f;
    joystick_angular_speed_ = 0.0f;

    linear_mission_demand_ = 0.0f;
    angular_mission_demand_ = 0.0f;

    manual_locomotion_mode_ = false;
    linear_set_speed_ = 0.5f;
    angular_set_speed_ = 2.5f;

    // Obtain any configuration values from the parameter server.
    // If they don't exist, use the defaults above
    nh_.param("/controller/axes/linear_speed_index", linear_speed_index_, 0);
    nh_.param("/controller/axes/angular_speed_index", angular_speed_index_, 1);
    nh_.param("/controller/axes/camera_x_index", camera_x_index_, 2);
    nh_.param("/controller/axes/camera_y_index", camera_y_index_, 3);
    nh_.param("/controller/buttons/manual_mode_select", manual_mode_select_, 0);
    nh_.param("/controller/buttons/default_camera_pos_select", default_camera_pos_select_, 1);
    nh_.param("/controller/dead_zone", dead_zone_, 2000);
    nh_.param("/teleop/max_linear_speed", max_linear_speed_, 3.0f);
    nh_.param("/teleop/max_angular_speed", max_angular_speed_, 3.0f);
    nh_.param("/motor/ramp/linear", ramp_for_linear_, 5.0f);
    nh_.param("/motor/ramp/angular", ramp_for_angular_, 5.0f);
    nh_.param("/battery/warning_level", voltage_level_warning_, 9.5f);
    nh_.param("/sounds/enabled", wav_play_enabled_, false);

    // Obtain the filename and text for the wav files that can be played
    nh_.getParam("/sounds/filenames", wav_file_names_);
    nh_.getParam("/sounds/text", wav_file_texts_);

    // Subscribe to receive keyboard input, joystick input,
    // mission complete and battery state
    key_sub_ = nh_.subscribe("keyboard/keydown", 5, &EaseRobotNode::keyboardCallBack, this);
    joy_sub_ = nh_.subscribe("joy", 1, &EaseRobotNode::joystickCallback, this);
    mission_sub_ = nh_.subscribe("/missions/mission_complete", 5,
                                  &EaseRobotNode::completeCallBack, this);
    battery_status_sub_ = nh_.subscribe("main_battery_status", 1,
                                         &EaseRobotNode::batteryCallback, this);

    // The cmd_vel topic below is the command velocity message to the motor driver.
    // This can be created from either keyboard or game pad input when in manual mode
    // or from this subscribed topic when in autonomous mode.
    // It will probably be remapped from the navigation stack
    demand_sub_ = nh_.subscribe("demand_vel", 5, &EaseRobotNode::motorDemandCallBack, this);

    // Advertise the topics we publish
    face_status_pub_ = nh_.advertise<std_msgs::String>("/robot_face/expected_input", 5);
    mission_pub_ = nh_.advertise<std_msgs::String>("/missions/mission_request", 10);
    cancel_pub_ = nh_.advertise<std_msgs::Empty>("/missions/mission_cancel", 5);
    ack_pub_ = nh_.advertise<std_msgs::Empty>("/missions/acknowledge", 5);
    twist_pub_ = nh_.advertise<geometry_msgs::Twist>("cmd_vel", 1);
    reset_odom_ = nh_.advertise<std_msgs::Empty>("/commands/reset_odometry", 1);

    battery_low_count_ = 0;
    mission_running_ = false;

    // Seed the random number generator
    srand((unsigned)time(0));

    last_interaction_time_ = ros::Time::now();
}
It delves into the composition of the class, highlighting the joystickCallback function. This function is triggered when a message is received via the Joy topic, enabling the joystick or gamepad controller to navigate the robot and control the head/camera movements in manual mode.
The joystick data is organized into two arrays: one containing the current axis positions and the other storing the current button states. The specific axis and button indices used can be customized through the parameter server.
The function begins by reading the axis values that govern the robot's angular and linear velocity. These values are then compared to a deadband value, which determines the minimum axis movement required to affect the robot's control. The controller values are subsequently converted into linear and velocity demands, ensuring that the maximum possible controller value corresponds to the robot's top speed. These values are stored for later use in the sendTwist method.
Next, the function reads the axis values responsible for controlling the head/camera movements in manual mode, applying a deadband to the values. If the robot is in manual locomotion mode, the values are transmitted as a "J3" job to the EaseRobot_mission_node.
Finally, the function examines the button values, with configurable indices for each function. One button toggles manual locomotion mode, canceling any ongoing robot mission if necessary. Another button provides a quick way to reset the head/camera to its default position.
void EaseRobotNode::joystickCallback(const sensor_msgs::Joy::ConstPtr& msg)
{
    float joystick_x_axes;
    float joystick_y_axes;

    // manual locomotion mode can use the joystick/game pad
    joystick_x_axes = msg->axes[angular_speed_index_];
    joystick_y_axes = msg->axes[linear_speed_index_];

    // Check dead zone values
    if(abs(joystick_x_axes) < dead_zone_)
    {
        joystick_x_axes = 0;
    }

    if(abs(joystick_y_axes) < dead_zone_)
    {
        joystick_y_axes = 0;
    }

    // Check for manual movement
    if(joystick_y_axes != 0)
    {
        joystick_linear_speed_ = -(joystick_y_axes*(max_linear_speed_/(float)MAX_AXES_VALUE_));
        last_interaction_time_ = ros::Time::now();
    }
    else
    {
        joystick_linear_speed_ = 0;
    }

    if(joystick_x_axes != 0)
    {
        joystick_angular_speed_ =
                -(joystick_x_axes*(max_angular_speed_/(float)MAX_AXES_VALUE_));
        last_interaction_time_ = ros::Time::now();
    }
    else
    {
        joystick_angular_speed_ = 0;
    }

    // Now check the joystick/game pad for manual camera movement
    joystick_x_axes = msg->axes[camera_x_index_];
    joystick_y_axes = msg->axes[camera_y_index_];

    // Check dead zone values
    if(abs(joystick_x_axes) < dead_zone_)
    {
        joystick_x_axes = 0;
    }

    if(abs(joystick_y_axes) < dead_zone_)
    {
        joystick_y_axes = 0;
    }

    if(manual_locomotion_mode_ == true)
    {
        if((joystick_x_axes != 0) || (joystick_y_axes != 0))
        {
            std_msgs::String mission_msg;
            mission_msg.data = "J3^";

            if(joystick_y_axes == 0)
            {
                mission_msg.data += "-^";
            }
            else if (joystick_y_axes > 0)
            {
                mission_msg.data += "u^";
            }
            else
            {
                mission_msg.data += "d^";
            }

            if(joystick_x_axes == 0)
            {
                mission_msg.data += "-";
            }
            else if (joystick_x_axes > 0)
            {
                mission_msg.data += "r";
            }
            else
            {
                mission_msg.data += "l";
            }

            mission_pub_.publish(mission_msg);

            last_interaction_time_ = ros::Time::now();
        }
    }

    // Button on controller selects manual locomotion mode
    if(msg->buttons[manual_mode_select_] == 1)
    {
        if(mission_running_ == true)
        {
            // Cancel the ongoing mission
            std_msgs::Empty empty_msg;
            cancel_pub_.publish(empty_msg);
        }

        // Reset speeds to zero
        keyboard_linear_speed_ = 0.0f;
        keyboard_angular_speed_ = 0.0f;

        manual_locomotion_mode_ = true;

        last_interaction_time_ = ros::Time::now();
    }

    // Button on controller selects central camera position
    if((manual_locomotion_mode_ == true) &&
       (msg->buttons[default_camera_pos_select_] == 1))
    {
        std_msgs::String mission_msg;
        mission_msg.data = "J3^c^-";
        mission_pub_.publish(mission_msg);

        last_interaction_time_ = ros::Time::now();
    }
}
The keyboardCallBack function is triggered whenever a message is received on the keyboard/keydown topic. This function interprets key presses to control the robot's movements and the head/camera when in manual mode.
The function first checks if the received message corresponds to a key that we are monitoring.
Number keys are used to select robot missions, with current interest focused on mission 2.
The 'A' key acknowledges a mission section by sending a message on the /missions/missions_acknowledge topic. The 'C' key requests the cancellation of the current mission by sending a message on the /missions/mission_cancel topic. The 'D' key repositions the head/camera to its default when the robot is in manual locomotion mode. The 'M' key switches the robot to manual locomotion mode and cancels any ongoing mission. The 'R' key resets the robot's odometry values by sending a message on the /command/reset_odometry topic. The numeric keypad is used to maneuver the robot in manual mode. For instance, pressing '1' moves the robot backward and rotates it counterclockwise, based on the current linear and angular speed settings. These speeds can be adjusted using the '+', '-', '*', and '/' keys on the numeric keypad:
'+' increases linear velocity by 10%. '-' decreases linear velocity by 10%. '*' increases angular velocity by 10%. '/' decreases angular velocity by 10%. The space bar halts the robot's movement.
Linear and angular velocities, essential for steering, will be elaborated upon when discussing the Twist message. Essentially, the robot steers by varying the speeds and directions of its two motors, with the degree of turning determined by the angular velocity.
The arrow keys (up, down, left, right) are used to control the head/camera when in manual mode.
void EaseRobotNode::keyboardCallBack(const keyboard::Key::ConstPtr& msg)
{
    // Check for any keys we are interested in
    // Current keys are:
    //      'Space' - Stop the robot from moving if in manual locomotion mode
    //      'Key pad 1 and Num Lock off' - Move robot forwards and
    //       counter-clockwise if in manual locomotion mode
    //      'Key pad 2 and Num Lock off' - Move robot backwards if in manual locomotion mode
    //      'Key pad 3 and Num Lock off' - Move robot backwards and
    //       clockwise if in manual locomotion mode
    //      'Key pad 4 and Num Lock off' - Move robot counter-clockwise
    //       if in manual locomotion mode
    //      'Key pad 6 and Num Lock off' - Move robot clockwise if in manual locomotion mode
    //      'Key pad 7 and Num Lock off' - Move robot forwards and
    //       counter-clockwise if in manual locomotion mode
    //      'Key pad 8 and Num Lock off' - Move robot foward if in manual locomotion mode
    //      'Key pad 9 and Num Lock off' - Move robot forwards and
    //       clockwise if in manual locomotion mode
    //      'Up key' - Move head/camera down in manual mode
    //      'Down key' - Move head/camera up in manual mode
    //      'Right key' - Move head/camera right in manual mode
    //      'Left key' - Move head/camera left in manual mode
    //      'Key pad +' - Increase linear speed by 10% (speed when using keyboard for teleop)
    //      'Key pad -' - Decrease linear speed by 10% (speed when using keyboard for teleop)
    //      'Key pad *' - Increase angular speed by 10% (speed when using keyboard for teleop)
    //      'Key pad /' - Decrease angular speed by 10% (speed when using keyboard for teleop)
    //      '1' to '9' - Run a mission (1 -9)
    //      'a' or 'A' - Some missions require the user to send an acknowledge
    //      'c' or 'C' - Cancel current mission
    //      'd' or 'D' - Move head/camera to the default position in manual mode
    //      'm' or 'M' - Set locomotion mode to manual
    //      'r' or 'R' - Reset the odometry

    // Check for a number key (not key pad) with modifiers apart from num lock is allowed
    if(((msg->code >= keyboard::Key::KEY_1) && (msg->code <= keyboard::Key::KEY_9)) &&
       ((msg->modifiers & ~keyboard::Key::MODIFIER_NUM) == 0))
    {
        // Start a mission
        std_msgs::String mission_msg;
        mission_msg.data = "M" + std::to_string(msg->code-keyboard::Key::KEY_0);
        mission_pub_.publish(mission_msg);

        mission_running_ = true;
        manual_locomotion_mode_ = false;

        last_interaction_time_ = ros::Time::now();
    }
    else if((msg->code == keyboard::Key::KEY_c) &&
           ((msg->modifiers & ~EaseRobotNode::SHIFT_CAPS_NUM_LOCK_) == 0))
    {
        // 'c' or 'C', cancel mission if one is running
        if(mission_running_ == true)
        {
            std_msgs::Empty empty_msg;
            cancel_pub_.publish(empty_msg);
        }

        last_interaction_time_ = ros::Time::now();
    }
    else if((msg->code == keyboard::Key::KEY_a) &&
           ((msg->modifiers & ~EaseRobotNode::SHIFT_CAPS_NUM_LOCK_) == 0))
    {
        // 'a' or 'A', acknowledge a mission step
        if(mission_running_ == true)
        {
            std_msgs::Empty empty_msg;
            ack_pub_.publish(empty_msg);
        }

        last_interaction_time_ = ros::Time::now();
    }
    else if((msg->code == keyboard::Key::KEY_d) &&
           ((msg->modifiers & ~EaseRobotNode::SHIFT_CAPS_NUM_LOCK_) == 0))
    {
        // 'd' or 'D', Move camera to default position
        if(manual_locomotion_mode_ == true)
        {
            std_msgs::String mission_msg;
            mission_msg.data = "J3^c^-";
            mission_pub_.publish(mission_msg);
        }

        last_interaction_time_ = ros::Time::now();
    }
    else if((msg->code == keyboard::Key::KEY_m) &&
           ((msg->modifiers & ~EaseRobotNode::SHIFT_CAPS_NUM_LOCK_) == 0))
    {
        // 'm' or 'M', set locomotion mode to manual
        // (any missions going to auto should set manual_locomotion_mode_ to false)
        // When in manual mode user can teleop EaseRobot with keyboard or joystick
        if(mission_running_ == true)
        {
            // Cancel the ongoing mission
            std_msgs::Empty empty_msg;
            cancel_pub_.publish(empty_msg);
        }

        // Reset speeds to zero
        keyboard_linear_speed_ = 0.0f;
        keyboard_angular_speed_ = 0.0f;

        manual_locomotion_mode_ = true;

        last_interaction_time_ = ros::Time::now();
    }
    else if((msg->code == keyboard::Key::KEY_r) &&
           ((msg->modifiers & ~EaseRobotNode::SHIFT_CAPS_NUM_LOCK_) == 0))
    {
        // 'r' or 'R', reset odometry command
        std_msgs::Empty empty_msg;
        reset_odom_.publish(empty_msg);

    }
    else if((msg->code == keyboard::Key::KEY_KP1) &&
           ((msg->modifiers & keyboard::Key::MODIFIER_NUM) == 0))
    {
        // Key 1 on keypad without num lock
        // If in manual locomotion mode, this is an indication
        // to move backwards and counter-clockwise by the current set speeds
        if(manual_locomotion_mode_ == true)
        {
            keyboard_linear_speed_ = -linear_set_speed_;
            keyboard_angular_speed_ = -angular_set_speed_;
        }

        last_interaction_time_ = ros::Time::now();
    }
    else if((msg->code == keyboard::Key::KEY_KP2) &&
           ((msg->modifiers & keyboard::Key::MODIFIER_NUM) == 0))
    {
        // Key 2 on keypad without num lock
        // If in manual locomotion mode this is an indication
        // to move backwards by the current linear set speed
        if(manual_locomotion_mode_ == true)
        {
            keyboard_linear_speed_ = -linear_set_speed_;
            keyboard_angular_speed_ = 0.0f;
        }

        last_interaction_time_ = ros::Time::now();
    }
    else if((msg->code == keyboard::Key::KEY_KP3) &&
           ((msg->modifiers & keyboard::Key::MODIFIER_NUM) == 0))
    {
        // Key 3 on keypad without num lock
        // If in manual locomotion mode this is an indication
        // to move backwards and clockwise by the current set speeds
        if(manual_locomotion_mode_ == true)
        {
            keyboard_linear_speed_ = -linear_set_speed_;
            keyboard_angular_speed_ = angular_set_speed_;
        }

        last_interaction_time_ = ros::Time::now();
    }
    else if((msg->code == keyboard::Key::KEY_KP4) &&
           ((msg->modifiers & keyboard::Key::MODIFIER_NUM) == 0))
    {
        // Key 4 on keypad without num lock
        // If in manual locomotion mode this is an indication
        // to turn counter-clockwise (spin on spot) by the current angular set speed
        if(manual_locomotion_mode_ == true)
        {
            keyboard_linear_speed_ = 0.0f;
            keyboard_angular_speed_ = angular_set_speed_;
        }

        last_interaction_time_ = ros::Time::now();
    }
    else if((msg->code == keyboard::Key::KEY_KP6) &&
           ((msg->modifiers & keyboard::Key::MODIFIER_NUM) == 0))
    {
        // Key 6 on keypad without num lock
        // If in manual locomotion mode this is an indication
        // to turn clockwise (spin on spot) by the current angular set speed
        if(manual_locomotion_mode_ == true)
        {
            keyboard_linear_speed_ = 0.0f;
            keyboard_angular_speed_ = -angular_set_speed_;
        }

        last_interaction_time_ = ros::Time::now();
    }
    else if((msg->code == keyboard::Key::KEY_KP7) &&
           ((msg->modifiers & keyboard::Key::MODIFIER_NUM) == 0))
    {
        // Key 7 on keypad without num lock
        // If in manual locomotion mode this is an indication
        // to move forwards and counter-clockwise by the current set speeds
        if(manual_locomotion_mode_ == true)
        {
            keyboard_linear_speed_ = linear_set_speed_;
            keyboard_angular_speed_ = angular_set_speed_;
        }

        last_interaction_time_ = ros::Time::now();
    }
    else if((msg->code == keyboard::Key::KEY_KP8) &&
           ((msg->modifiers & keyboard::Key::MODIFIER_NUM) == 0))
    {
        // Key 8 on keypad without num lock
        // If in manual locomotion mode this is an indication
        // to move forward by the current linear set speed
        if(manual_locomotion_mode_ == true)
        {
            keyboard_linear_speed_ = linear_set_speed_;
            keyboard_angular_speed_ = 0.0f;
        }

        last_interaction_time_ = ros::Time::now();
    }
    else if((msg->code == keyboard::Key::KEY_KP9) &&
           ((msg->modifiers & keyboard::Key::MODIFIER_NUM) == 0))
    {
        // Key 9 on keypad without num lock
        // If in manual locomotion mode this is an indication
        // to move forwards and clockwise by the current set speeds
        if(manual_locomotion_mode_ == true)
        {
            keyboard_linear_speed_ = linear_set_speed_;
            keyboard_angular_speed_ = -angular_set_speed_;
        }

        last_interaction_time_ = ros::Time::now();
    }
    else if(msg->code == keyboard::Key::KEY_SPACE)
    {
        // Space key
        // If in manual locomotion stop the robot movment
        if(manual_locomotion_mode_ == true)
        {
            keyboard_linear_speed_= 0.0f;
            keyboard_angular_speed_ = 0.0f;
        }

        last_interaction_time_ = ros::Time::now();
    }
    else if(msg->code == keyboard::Key::KEY_KP_PLUS)
    {
        // '+' key on num pad
        // If in manual locomotion increase linear speed by 10%
        if(manual_locomotion_mode_ == true)
        {
            linear_set_speed_ += ((10.0/100.0) * linear_set_speed_);
            ROS_INFO("Linear Speed now %f", linear_set_speed_);
        }

        last_interaction_time_ = ros::Time::now();
    }
    else if(msg->code == keyboard::Key::KEY_KP_MINUS)
    {
        // '-' key on num pad
        // If in manual locomotion decrease linear speed by 10%
        if(manual_locomotion_mode_ == true)
        {
            linear_set_speed_ -= ((10.0/100.0) * linear_set_speed_);
            ROS_INFO("Linear Speed now %f", linear_set_speed_);
        }

        last_interaction_time_ = ros::Time::now();
    }
    else if(msg->code == keyboard::Key::KEY_KP_MULTIPLY)
    {
        // '*' key on num pad
        // If in manual locomotion increase angular speed by 10%
        if(manual_locomotion_mode_ == true)
        {
            angular_set_speed_ += ((10.0/100.0) * angular_set_speed_);
            ROS_INFO("Angular Speed now %f", angular_set_speed_);
        }

        last_interaction_time_ = ros::Time::now();
    }
    else if(msg->code == keyboard::Key::KEY_KP_DIVIDE)
    {
        // '/' key on num pad
        // If in manual locomotion decrease angular speed by 10%
        if(manual_locomotion_mode_ == true)
        {
            angular_set_speed_ -= ((10.0/100.0) * angular_set_speed_);
            ROS_INFO("Angular Speed now %f", angular_set_speed_);
        }

        last_interaction_time_ = ros::Time::now();
    }
    else if(msg->code == keyboard::Key::KEY_UP)
    {
        // Up Key
        // This is a simple job not a mission - move the head/camera down
        if(manual_locomotion_mode_ == true)
        {
            std_msgs::String mission_msg;
            mission_msg.data = "J3^d^-";
            mission_pub_.publish(mission_msg);
        }

        last_interaction_time_ = ros::Time::now();
    }
    else if(msg->code == keyboard::Key::KEY_DOWN)
    {
        // Down Key
        // This is a simple job not a mission - move the head/camera up
        if(manual_locomotion_mode_ == true)
        {
            std_msgs::String mission_msg;
            mission_msg.data = "J3^u^-";
            mission_pub_.publish(mission_msg);
        }

        last_interaction_time_ = ros::Time::now();
    }
    else if(msg->code == keyboard::Key::KEY_LEFT)
    {
        // Left key
        // This is a simple job not a mission - move the head/camera left
        if(manual_locomotion_mode_ == true)
        {
            std_msgs::String mission_msg;
            mission_msg.data = "J3^-^l";
            mission_pub_.publish(mission_msg);
        }

        last_interaction_time_ = ros::Time::now();
    }
    else if(msg->code == keyboard::Key::KEY_RIGHT)
    {
        // Right Key
        // This is a simple job not a mission - move the head/camera right
        if(manual_locomotion_mode_ == true)
        {
            std_msgs::String mission_msg;
            mission_msg.data = "J3^-^r";
            mission_pub_.publish(mission_msg);
        }

        last_interaction_time_ = ros::Time::now();
    }
    else
    {
        ;
    }
}
The batteryCallback function is invoked when a message is received on the main_battery_status topic. This topic uses the sensor_msgs/BatteryState message type, which provides detailed information about the battery. However, for our purposes, we are only concerned with the battery voltage level.
Upon receiving the battery voltage, the callback function will publish a message indicating whether the battery level is good or bad, along with the voltage level. This message will be published on the /robot_face/expected_input topic and displayed below the robot's animated face.
The voltage threshold that determines if the battery is low can be configured using the parameter server. If the battery voltage falls below this threshold, in addition to the warning displayed below the animated face, a request will be sent every 5 minutes prompting the robot to deliver a low battery warning. This request will be sent to the easerobot_mission_node with an ID of "J2". The first parameter will contain the text for the robot to speak, and the second parameter will be the text displayed on the animated face, which includes the ":(" emoticon to make the robot appear sad.
// Callback for main battery status
void EaseRobotNode::batteryCallback(const sensor_msgs::BatteryState::ConstPtr& msg)
{
    // Convert float to string with two decimal places
    std::stringstream ss;
    ss << std::fixed << std::setprecision(2) << msg->voltage;
    std::string voltage = ss.str();

    std_msgs::String status_msg;

    // Publish battery voltage to the robot face
    // However the '.' will be used by the face to change the expression to neutral
    // so we will replace with ','
    replace(voltage.begin(), voltage.end(), '.', ',');

    if(msg->voltage > voltage_level_warning_)
    {
        status_msg.data = "Battery level OK ";
        battery_low_count_ = 0;
    }
    else
    {
        // If the battery level goes low we wait a number of messages
        // to confirm it was not a dip as the motors started
        if(battery_low_count_ > 1)
        {
            status_msg.data = "Battery level LOW ";

            // Speak warning every 5 minutes
            if((ros::Time::now() - last_battery_warn_).toSec() > (5.0*60.0))
            {
                last_battery_warn_ = ros::Time::now();

                std_msgs::String mission_msg;
                mission_msg.data = "J2^battery level low^Battery level low:(";
                mission_pub_.publish(mission_msg);
            }
        }
        else
        {
            battery_low_count_++;
        }
    }

    status_msg.data += voltage + "V";
    face_status_pub_.publish(status_msg);
}
The completeCallBack function is triggered whenever a message is received on the /missions/mission_complete topic. This function's primary role is to indicate that the robot has finished its current mission. It achieves this by setting the missions_running_ variable to false.
void EaseRobotNode::completeCallBack(const std_msgs::String::ConstPtr& msg)
{
    mission_running_ = false;

    last_interaction_time_ = ros::Time::now();
}
The motorDemandCallBack function is activated when a message is received on the demand_vel topic.
This function handles the robot's movements, whether they are manual or autonomous. It is responsible for processing movement demands originating from either the keyboard or joystick in manual mode or from the autonomous subsystem. The motorDemandCallBack function's main task is to store the linear and angular velocity demands provided by the autonomous subsystem.
// Callback for when motor demands received in autonomous mode
void EaseRobotNode::motorDemandCallBack(const geometry_msgs::Twist::ConstPtr& msg)
{
    linear_mission_demand_ = msg->linear.x;
    angular_mission_demand_ = msg->angular.z;
}
The sendTwist function is called within the main loop and is responsible for determining which input—joystick, keyboard, or the autonomous subsystem—should be used to request the actual motor demands. These demands are then published as a message on the cmd_vel topic. It is essential to publish a demand continuously to maintain a constant rate, as the motor control system relies on these inputs to avoid shutting down for safety reasons.
The message type used is geometry_msgs/Twist, which includes two vectors: one for linear velocity (meters/second) and one for angular velocity (radians/second). For linear velocity, only the x direction is used, and for angular velocity, only the z direction is utilized. Although this message type might seem excessive, it allows for integration with existing path planning and obstacle avoidance software later in the project. Additionally, publishing on this topic enables the simulation of robot movements in Gazebo, a robot simulation tool that will be used to test some of the code in this article.
To smoothly ramp up the velocities to the target demands, the sendTwist function utilizes two helper functions: rampedTwist and rampedVel. These functions help to gradually increase the target velocities, preventing skidding and shuddering that might occur if the robot's velocity were to change abruptly. The code for these helper functions is adapted from the Python code in the O'Reilly book "Programming Robots with ROS".
void EaseRobotNode::sendTwist(void)
{
    geometry_msgs::Twist target_twist;

    // If in manual locomotion mode use keyboard or joystick data
    if(manual_locomotion_mode_ == true)
    {
        // Publish message based on keyboard or joystick speeds
        if((keyboard_linear_speed_ == 0) && (keyboard_angular_speed_ == 0))
        {
            // Use joystick values
            target_twist.linear.x = joystick_linear_speed_;
            target_twist.angular.z = joystick_angular_speed_;
        }
        else
        {
            // use keyboard values
            target_twist.linear.x = keyboard_linear_speed_;
            target_twist.angular.z = keyboard_angular_speed_;
        }
    }
    else
    {
        // Use mission demands (autonomous)
        target_twist.linear.x = linear_mission_demand_;
        target_twist.angular.z = angular_mission_demand_;
    }

    ros::Time time_now = ros::Time::now();

    // Ramp towards are required twist velocities
    last_twist_ = rampedTwist(last_twist_, target_twist, last_twist_send_time_, time_now);

    last_twist_send_time_ = time_now;

    // Publish the Twist message
    twist_pub_.publish(last_twist_);
}
//---------------------------------------------------------------------------

geometry_msgs::Twist EaseRobotNode::rampedTwist(geometry_msgs::Twist prev,
                                             geometry_msgs::Twist target,
                                             ros::Time time_prev, ros::Time time_now)
{
    // Ramp the angular and linear values towards the tartget values
    geometry_msgs::Twist retVal;

    retVal.angular.z = rampedVel(prev.angular.z, target.angular.z,
                       time_prev, time_now, ramp_for_angular_);
    retVal.linear.x = rampedVel(prev.linear.x, target.linear.x,
                      time_prev, time_now, ramp_for_linear_);

    return retVal;
}
//---------------------------------------------------------------------------

float EaseRobotNode::rampedVel(float velocity_prev, float velocity_target,
                            ros::Time time_prev, ros::Time time_now,
                            float ramp_rate)
{
    // Either move towards the velocity target or if difference is small jump to it
    float retVal;
    float sign;
    float step = ramp_rate * (time_now - time_prev).toSec();

    if(velocity_target > velocity_prev)
    {
        sign = 1.0f;
    }
    else
    {
        sign = -1.0f;
    }

    float error = std::abs(velocity_target - velocity_prev);

    if(error < step)
    {
        // Can get to target in this within this time step
        retVal = velocity_target;
    }
    else
    {
        // Move towards our target
        retVal = velocity_prev + (sign * step);
    }

    return retVal;
}
The checkTimers function is another function called from the main loop, serving two purposes.
Inactivity Reminder:
If the robot has been inactive (not manually controlled) or has completed its last mission more than 15 minutes ago, it will play a pre-recorded wav file to remind you that it is still powered on. This feature can be disabled by using the /sounds/enabled parameter in the parameter server.
Humorous Sci-Fi Robot Impressions:
This feature reflects a bit of humor: the pre-recorded wav files are Sci-Fi robot quotes. The idea is that if the robot is "bored," it might entertain itself with robot impressions like "Danger Will Robinson, danger." If this isn't appealing, you can disable the feature or replace the wav files with something else to indicate that the robot is still powered up and inactive. The parameter server stores several wav file names and corresponding text sentences. When a wav file needs to be played, a random number is generated to select which wav file to play. The request is then sent using the ID "J1".
void EaseRobotNode::checkTimers(void)
{
    /* Check time since last interaction */
    if((wav_play_enabled_ == true) && (mission_running_ == false) &&
      ((ros::Time::now() - last_interaction_time_).toSec() > (15.0*60.0)))
    {
        last_interaction_time_ = ros::Time::now();

        // Use a random number to pick the wav file
        int random = (rand()%wav_file_names_.size())+1;

        // This is a simple job not a mission
        std_msgs::String mission_msg;
        std::string path = ros::package::getPath("easerobot");
        mission_msg.data = "J1^" + path + "/sounds/" +
                           wav_file_names_[std::to_string(random)] +
                           "^" + wav_file_texts_[std::to_string(random)];
        mission_pub_.publish(mission_msg);
    }
}
Joystick Node
Throughout this project, we've implemented functionality to allow the robot to be controlled manually using a joystick or game pad controller. The ROS Wiki provides a joystick node package called joy.
However, I encountered segmentation faults with this package on two different Linux PCs. Rather than investigating the issue in depth, I created a simpler joystick node. This custom node avoids handling complexities like sticky buttons.
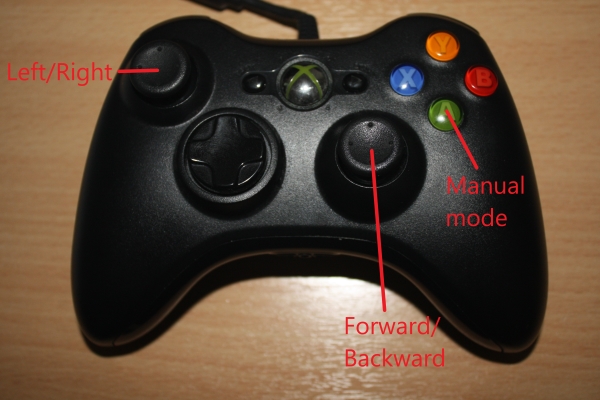
I recommend trying the ROS Wiki package first. If you encounter similar issues, you can use my ROS package, available in the joystick folder. I've successfully tested it with a Microsoft Xbox 360 Wired Controller. Below is the joystick_node.cpp file from my package:
#include <ros/ros.h>
#include <sensor_msgs/Joy.h>
#include <geometry_msgs/Twist.h>

class JoystickNode
{
public:
    JoystickNode()
    {
        // Initialize ROS node handle
        nh_ = ros::NodeHandle();

        // Subscribe to the joystick topic
        joy_sub_ = nh_.subscribe<sensor_msgs::Joy>("joy", 10, &JoystickNode::joyCallback, this);

        // Publisher for the robot velocity commands
        cmd_vel_pub_ = nh_.advertise<geometry_msgs::Twist>("cmd_vel", 1);
    }

    void joyCallback(const sensor_msgs::Joy::ConstPtr& joy)
    {
        geometry_msgs::Twist twist;

        // Map joystick axes to linear and angular velocities
        twist.linear.x = joy->axes[1];  // Left stick vertical axis
        twist.angular.z = joy->axes[0]; // Left stick horizontal axis

        // Publish the velocity command
        cmd_vel_pub_.publish(twist);
    }

private:
    ros::NodeHandle nh_;
    ros::Subscriber joy_sub_;
    ros::Publisher cmd_vel_pub_;
};

int main(int argc, char** argv)
{
    // Initialize the ROS system
    ros::init(argc, argv, "joystick_node");

    // Create an instance of the JoystickNode class
    JoystickNode joystick_node;

    // Enter a loop, pumping callbacks
    ros::spin();
}
This simple node subscribes to the joy topic to receive joystick input and publishes velocity commands to the cmd_vel topic, allowing the robot to be controlled manually.
Using the Code
To test the code we've developed so far, we'll run tests on both the actual robot hardware and the Gazebo robot simulator tool running on a Linux PC. In the easerobot/urdf folder, there's a file named easerobot.urdf which models the EaseRobot Robot. Although creating a URDF (Unified Robot Description Format) model is a complex topic, detailed information is available on the ROS Wiki website. My URDF model is a work in progress but sufficient for testing robot locomotion. All necessary files are included in the easerobot and easerobot_sim_control folders.
Building the ROS Packages on the Workstation
To run the simulation and control the actual robot hardware remotely using keyboard and joystick nodes, follow these steps to create a workspace:
Create a workspace:
$ mkdir -p ~/test_ws/src
$ cd ~/test_ws/
$ catkin_make
Copy the packages:
Copy the easerobot, joystick, easerobot_sim_control, and ros-keyboard (from ros-keyboard GitHub repository) into the ~/test_ws/src folder.
Build the code:
$ cd ~/test_ws/
$ catkin_make
Ensure the build completes without any errors.
Running the Simulation
In the easerobot_sim_control package, there is a launch file to load the robot model, launch Gazebo, and spawn a robot simulation.
Launch the simulation:
$ cd ~/test_ws/
$ source devel/setup.bash
$ roslaunch easerobot_sim_control easerobot_sim_control.launch
After a short time, you should see the EaseRobot model in an empty world with the simulation paused.
Load the EaseRobot config file and run the EaseRobot node: Open a new terminal and run:
$ cd ~/test_ws
$ source devel/setup.bash
$ rosparam load src/easerobot/config/config.yaml
$ rosrun easerobot easerobot_node
An info message should confirm that the node is running.
Test autonomous subsystem control:
Start the simulation by clicking the play button in Gazebo. In a new terminal, send a message to the demand_vel topic:
$ rostopic pub -1 /demand_vel geometry_msgs/Twist '{linear: {x: 0.5}}'
The robot should move forward at 0.5 meters/second.
To reverse:
$ rostopic pub -1 /demand_vel geometry_msgs/Twist '{linear: {x: -0.5}}'
To stop:
$ rostopic pub -1 /demand_vel geometry_msgs/Twist '{linear: {x: 0.0}}'
To turn on the spot:
$ rostopic pub -1 /demand_vel geometry_msgs/Twist '{angular: {z: 1.0}}'
Reverse direction by using a negative value and stop the rotation by setting the value to zero.
Testing Keyboard Functionality
Run the keyboard node:
$ cd ~/test_ws
$ source devel/setup.bash
$ rosrun keyboard keyboard
A window titled "ROS keyboard input" should appear. Ensure this window is focused, then press the 'm' key to enable manual locomotion mode.
Control the robot using the numeric keypad:
Forward: Keypad 8
Reverse: Keypad 2
Rotate anti-clockwise: Keypad 4
Rotate clockwise: Keypad 6
Forward and left: Keypad 7
Forward and right: Keypad 9
Reverse and left: Keypad 1
Reverse and right: Keypad 3
Increase linear velocity: Keypad +
Decrease linear velocity: Keypad -
Increase angular velocity: Keypad *
Decrease angular velocity: Keypad /
Stop the robot: Space bar
Testing Joystick Controller
Ensure the robot is stationary.
Run the joystick node:
$ cd ~/test_ws/
$ source devel/setup.bash
$ rosrun joystick joystick_node
A message indicating that the node has started should be displayed.
Control the robot with the Xbox 360 controller:
The specific controls will depend on the configuration in the easerobot/config/config.yaml file. Generally, the left joystick will control linear and angular velocities.
By following these steps, you can test the code on both the actual robot hardware and the Gazebo simulation environment, ensuring all functionalities work as intended.
Building the ROS Packages on the Raspberry Pi (Robot Hardware)
To build and run the ROS packages on the Raspberry Pi for the robot hardware, follow these steps:
Create a catkin workspace:
$ mkdir -p ~/easerobot_ws/src
$ cd ~/easerobot_ws/
$ catkin_make
Copy the necessary packages:
Copy the following packages into the ~/easerobot_ws/src folder:
face_recognition
face_recognition_msgs
head_control
pan_tilt
easerobot
easerobot_missions
servo_msgs
speech
ros-keyboard (from ros-keyboard GitHub repository)
Build the code:
$ cd ~/easerobot_ws/
$ catkin_make
Ensure the build completes without any errors.
Compile and download the Arduino code:
You will need to compile and upload the Arduino code to the Nano to control the servos.
Train the face recognition software:
If not already done, follow the instructions in Part 2 to train the face recognition software.
Running the Code on the Robot
Launch the nodes on the robot:
With the Arduino connected to a USB port, use the launch file to start the nodes:
$ cd ~/easerobot_ws
$ source devel/setup.bash
$ roslaunch easerobot easerobot.launch
If no master node is running, this command will also launch roscore.
Start the keyboard node on the workstation:
On your Linux PC connected to the same network as the robot, run:
$ cd ~/test_ws
$ source devel/setup.bash
$ export ROS_MASTER_URI=http://ubiquityrobot:11311
$ rosrun keyboard keyboard
A window titled "ROS keyboard input" should appear.
Testing the Robot Hardware
Test 1: Running Mission 2
- Ensure the keyboard window has focus.
- Press the '2' key to start Mission 2.
The robot should begin moving its head/camera, scanning the room for known faces. After completing the scan, it will report either that no one was recognized or greet any recognized individuals.
Test 2: Manual Mode with Keyboard
- Ensure the keyboard window has focus.
- Press the 'm' key to enter manual mode.
- Use the cursor keys to move the head/camera.
- Press the 'd' key to return the head/camera to the default position.
Test 3: Manual Mode with Joystick Controller
Ensure the robot is stationary.
In a new terminal on the workstation, run:
$ cd ~/test_ws
$ source devel/setup.bash
$ export ROS_MASTER_URI=http://ubiquityrobot:11311
$ rosrun joystick joystick_node
A message indicating the node has started should appear.
With the configuration provided in the unchanged easerobot/config/config.yaml file and a wired Xbox 360 controller, you can control the robot head/camera movement using the joystick controls.
By following these steps, you can build and test the ROS packages on the Raspberry Pi, ensuring the robot hardware functions as expected and can be controlled remotely using a keyboard or joystick.

Testing Status Indication
To test the status indication of the robot, follow these steps:
Ensure the environment is set up correctly:
Open a terminal on your workstation and execute the following commands:
$ cd ~/test_ws
$ source devel/setup.bash
$ export ROS_MASTER_URI=http://ubiquityrobot:11311
Test Battery Status - Normal Level:
- Send a message to simulate a normal battery level:
$ rostopic pub -1 main_battery_status sensor_msgs/BatteryState '{voltage: 12}'
The status below the robot face should read "Battery level OK 12.00V".
Test Battery Status - Low Level:
Send a message to simulate a low battery level:
$ rostopic pub -1 main_battery_status sensor_msgs/BatteryState '{voltage: 9.4}'
The status below the robot face should read "9.40V".
Test Low Battery Warning:
Send the low battery message two more times to trigger the warning:
$ rostopic pub -1 main_battery_status sensor_msgs/BatteryState '{voltage: 9.4}'
$ rostopic pub -1 main_battery_status sensor_msgs/BatteryState '{voltage: 9.4}'
The status should read "Battery level low 9.40V".
The robot should speak a battery low warning.
The robot's facial expression should appear sad.
Test Suppression of Repeated Warnings:
Send the low battery message within 5 minutes of the last message:
$ rostopic pub -1 main_battery_status sensor_msgs/BatteryState '{voltage: 9.4}'
The warning should not be spoken again.
Test Repeated Warning After 5 Minutes:
Wait for 5 minutes and send the low battery message again:
$ rostopic pub -1 main_battery_status sensor_msgs/BatteryState '{voltage: 9.4}'
The spoken warning should be repeated.
Testing WAV File Playback
To test the functionality for WAV file playback, follow these steps:
- Ensure the robot is inactive: Ensure no commands are issued from either the keyboard or joystick node.
- Wait for 15 minutes: After issuing the last command, wait for 15 minutes.
- Observe WAV file playback: The robot should play a random WAV file.
The robot's mouth should animate along with the WAV file playback.
Debugging with rqt_graph
To aid debugging, you can use rqt_graph to visualize the current ROS system state: Install rqt_graph (if not already installed):
$ sudo apt-get install ros-<your_ros_distro>-rqt-graph
Replace
Run rqt_graph:
$ rqt_graph
A graphical representation of the ROS nodes and topics will be displayed.
You can use this to ensure all nodes and topics are connected as expected.
A full-size copy of the rqt_graph output image is included in the source zip file for further reference.
By following these steps, you can thoroughly test the status indication and WAV file playback functionalities of your robot.
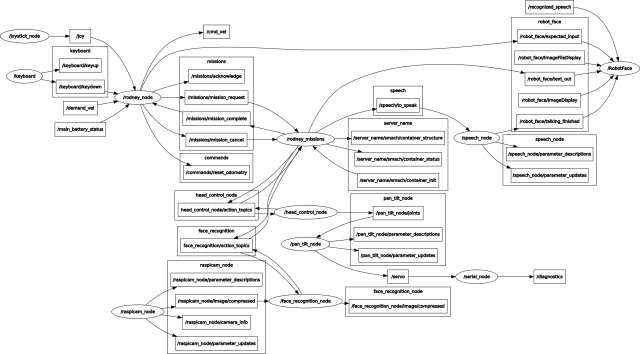
Summary
In this section, we've integrated code to regulate EaseRobot's actions, combining the code for Design Goals 1 and 2 to form Mission 2.
In our upcoming article, we'll fulfill Design Goal 3 by incorporating motors, a motor controller board, and software to operate the board. We'll also delve into the comprehensive EaseRobot hardware requirements, including circuit diagrams and a detailed list of necessary components.