Bringing EaseRobot to Life with Facial Expressions and Speech Synthesis
Introduction
Welcome to the third installment of our EaseRobot project series, where we're building an autonomous house bot using the Robot Operating System (ROS). In this article, we'll focus on giving EaseRobot a personality with facial expressions and speech synthesis.
Background
In Part 1, we defined the requirements for our robot and broke down our first mission into manageable Design Goals. Our mission is to create a robot that can take messages to family members, leveraging its ability to recognize individuals. The Design Goals for this mission are:
- Design Goal 1: Enable EaseRobot to search for faces, identify people, and display messages using its camera.
- Design Goal 2: Equip EaseRobot with facial expressions and speech synthesis to deliver messages effectively.
- Design Goal 3: Implement remote keyboard and/or joystick control for locomotion.
- Design Goal 4: Integrate a laser ranger finder or similar ranging sensor for navigation.
- Design Goal 5: Achieve autonomous locomotion.
- Design Goal 6: Develop task assignment and completion notification.
In Part 2, we completed Design Goal 1. Now, we'll focus on giving EaseRobot facial expressions and speech capabilities to complete Design Goal 2.
Mission 1, Design Goal 2: Facial Expression and Speech Synthesis
Facial Expression
To bring EaseRobot to life, we'll utilize the homer_robot_face package from the University of Koblenz, which includes two selectable faces and allows us to model our own character. This package also features speech synthesis using the Mary TTS (Text to Speech) generator. However, since this requires significant memory, we'll develop a custom TTS node suitable for the Raspberry Pi later in this article.
To set up the robot face package for ROS Kinetic, execute the following command in a terminal:
$ sudo apt-get install ros-kinetic-homer-robot-face
Next, configure the face by editing the config.cfg file. Although it would be more convenient to pass the configuration file path as a node parameter, the file location is hardcoded. Therefore, edit the file within the package folder. You'll find the config.cfg file and example files in the /opt/ros/kinetic/share/homer_robot_face/config folder. The package comes with two sets of mesh files: 'Lisa' for a female face and 'GiGo' for a male face. For the EaseRobot project, I edited the config.cfg file to contain the following:
Mesh Filename : GiGo
Head Color : 1.0, 1.0, 1.0
Iris Color : 0.0, 1.0, 1.0
Outline Color : 0.0, 0.0, 0.0
Voice : male
Window Width : 600
Window Height : 600
Window Rotation : 0
Note that the Voice parameter is not used since we'll be implementing our own speech synthesis node.
If you're feeling creative, you can design your own character by following the guidelines on modeling a face at http://wiki.ros.org/robot_face.
Testing the Installation and Configuration
To verify the installation and configuration, follow these steps:
Open a terminal and start a ROS master node with the command:
$ roscore
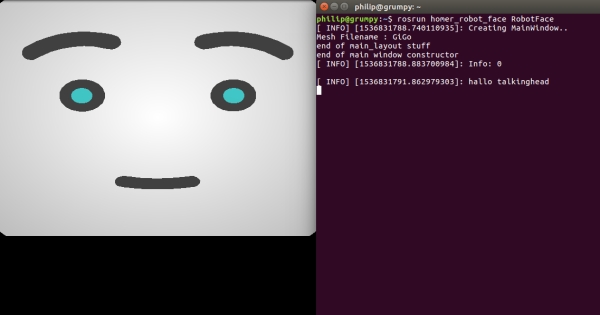
In a second terminal, start the robot face node with the command:
$ rosrun homer_robot_face RobotFace
On my Linux PC, I got the following neutral facial expression.
open another terminal and enter the following command:
$ rqt_graph
The graph reveals that the node subscribes to several topics, including:
- /robot_face/talking_finished - Send a message on this topic to indicate speech generation is complete
- /robot_face_expected_input - Display a status message below the face using this topic
- /robot_face_image_display - Not utilized in the EaseRobot project
- /robot_face_ImageFileDisplay - Not utilized in the EaseRobot project
- /robot_face/text_out - Animate the mouth and display text below the face using this topic; embed smileys to change facial expressions
- /recognized/speech - Not utilized in the EaseRobot project
Let's use rostopic to demonstrate these interactions. In a terminal, execute the following commands:
$ rostopic pub -1 /robot_face/expected_input std_msgs/String "Battery Low"
You should see the status message displayed below the face.
$ rostopic pub -1 /robot_face/text_out std_msgs/String "Hello my name is EaseRobot:)"
You should see the text below the face (minus the smiley), the face should animate the speech, and change from the neutral expression to a happy expression.
Now, send the following command to indicate speech completion:
$ rostopic pub -1 /robot_face/talking_finished std_msgs/String "q"
Note that the contents of this string are irrelevant, but sending this message is necessary for the face to respond to another /robot_face/text_out message.
In the /robot_face/text_out message, we changed the expression using a smiley ":)", which is one of the available options:
- "." Neutral
- ":)" Happy
- ":(" Sad
- ">:" Angry
- ":!" Disgusted
- ":&" Frightened
- ":O" or ":o" Surprised
We'll revisit the robot face node when we integrate it into our EaseRobot system.
Giving EaseRobot a Voice
Now that we've installed the robot face package, we'll also have the MARY TTS System installed. However, we'll be creating a ROS node that utilizes the more straightforward pico2wav TTS system. Our node will employ pico2wav to generate a temporary wav file, which will then be played back. Additionally, we'll add functionality to play existing short wav files.
Our ROS package for the node is called speech and is located in the speech folder. The package contains all the standard ROS files and folders.
The cfg folder contains the file speech.cfg. This file is utilized by the dynamic reconfiguration server, enabling us to adjust certain wav playback parameters in real-time. We previously used the dynamic reconfiguration server in part 1 of the article to trim the servos. This file contains the following Python code.
#!/usr/bin/env python
PACKAGE = "speech"

from dynamic_reconfigure.parameter_generator_catkin import *

gen = ParameterGenerator()

gen.add("pitch",  int_t,    0, "Playback Pitch",  -300,  -1000, 1000)
gen.add("vol",    double_t, 0, "Playback volume", 0.75, 0,   1)
gen.add("bass",   int_t,    0, "Bass",            0, -10, 10)
gen.add("treble", int_t,   0, "Treble",          0, -10, 10)
gen.add("norm",   bool_t,   0, "Normalise audio", True)

lang_enum = gen.enum([ gen.const("en_US", str_t, "en-US", "English US"),
                       gen.const("en_GB", str_t, "en-GB", "English GB"),
                       gen.const("fr_FR", str_t, "fr-FR", "French"),
                       gen.const("es_ES", str_t, "es-ES", "Spanish"),
                       gen.const("de_DE", str_t, "de-DE", "German"),
                       gen.const("it_IT", str_t, "it-IT", "Italian")],
                     "An enum to set the language")

gen.add("lang", str_t, 0, "Voice language", "en-GB", edit_method=lang_enum)

exit(gen.generate(PACKAGE, "speechnode", "Speech"))
For a comprehensive understanding of the dynamic reconfiguration server, please refer to the ROS Wiki section on dynamic reconfiguration. In our file, you can see that we add six parameters to the dynamic configuration server.
The msg folder contains a definition file for a user-defined message. The file is named voice.msg and contains the following:
string text # Text to speak
string wav  # Path to file to play
The message contains two elements: text, which will contain the text to be converted into speech, and wav, which will contain a path and filename of a wav file to play. Our code will first check to see if wav contains a path, and if so, it will play the wav file. If wav is an empty string, then text will be used to create a wav file.
The include/speech and src folders contain the C++ code for the package. For this package, we have one C++ class, SpeechNode, and a main routine contained within the speech_node.cpp file.
The main routine initializes our node, creates an instance of our class that contains the code for the node, sets up a callback function for the dynamic reconfiguration server, and creates a ros::Rate variable to control the loop frequency at 10Hz. Inside the loop, we call the speakingFinished function, which will be described later in this article.
The loop continues to execute as long as ros::ok() returns true. It will return false when the node is shutting down, such as when you press Ctrl-c on the keyboard.
Here is the C++ code for the main function:
int main(int argc, char **argv)
{
    ros::init(argc, argv, "speech_node");

    SpeechNode *speech_node = new SpeechNode();

    dynamic_reconfigure::Server<speech::SpeechConfig> server;
    dynamic_reconfigure::Server<speech::SpeechConfig>::CallbackType f;

    f = boost::bind(&SpeechNode::reconfCallback, speech_node, _1, _2);
    server.setCallback(f);

    std::string node_name = ros::this_node::getName();
    ROS_INFO("%s started", node_name.c_str());

    ros::Rate r(speech_node->LOOP_FREQUENCY_);

    while(ros::ok())
    {
        speech_node->speakingFinished();

        ros::spinOnce();
        r.sleep();
    }

    return 0;
}
The constructor for our class subscribes to the /speech/to_speak topic to receive text to speak or the location of the wav file to play. It also advertises that it will publish the /robot_face/talking_finished topic, which informs the face that the talking has finished.
Here is the C++ code for the constructor:
SpeechNode::SpeechNode()
{
    voice_sub_ = n_.subscribe("/speech/to_speak", 5, &SpeechNode::voiceCallback, this);

    talking_finished_pub_ = n_.advertise<std_msgs::String>("/robot_face/talking_finished", 5);

    finished_speaking_ = false;
}
Now, let's briefly describe the functions that make up the class.
The reconfCallback function is called by the dynamic reconfiguration server when any of the parameters are changed. This function simply stores the new values for use in the next playback of the temporary speech wav file.
Here is the C++ code for the reconfCallback function:
void SpeechNode::reconfCallback(speech::SpeechConfig &config, uint32_t level)
{
    language_ = config.lang;
    vol_ = config.vol;
    pitch_ = config.pitch;
    bass_ = config.bass;
    treble_ = config.treble;
    norm_ = config.norm;
}
The voiceCallback function is called when a message on the /speech/to_speak topic is received. If the wav element of the message is not empty, then the supplied wav filename is played using sox (Sound eXchange). Note that since we want to playback an already existing wav file and not speak in our robot's voice, none of the dynamic reconfiguration parameters are used.
If the wav element is empty, then the string in the text element is to be spoken. We start by constructing a string for the call to pico2wav, which includes our temporary filename and the language parameter. The call to pico2wav should result in the creation of a wav file without text converted to speech. A string is then constructed to be used in making a system call to sox, this time using the dynamic reconfiguration parameters so that we can control the sound of the robot's voice. For example, pico2wav only contains a female voice, but by changing the pitch, we can give the robot a male voice (which we want since ours is called EaseRobot).
The voiceCallback function finishes by setting a flag to indicate that we need to send a message on the /robot_face/talking_finished topic. We also set a countdown counter value, which is used to time 20 executions of the control loop before the /robot_face/talking_finished message is sent.
Here is the C++ code for the voiceCallback function:
void SpeechNode::voiceCallback(const speech::voice& voice)
{
    // Check if we have a path to a stock wav file
    if(voice.wav!= "")
    {
        // Play stock wav file using sox (Sound eXchange)
        std::string str = "play " + voice.wav + " --norm -q";
        ROS_DEBUG("%s", str.c_str());

        if(system(str.c_str())!= 0)
        {
            ROS_DEBUG("SpeechNode: Error on wav playback");
        }
    }
    else
    {
        std::string filename = "/tmp/robot_speech.wav";

        std::string str;

        // Create wav file using pico2wav from adjusted text
        str = "pico2wave --wave=" + filename + " --lang=" +
               language_ + " \"" + voice.text + "\"";

        ROS_DEBUG("%s", str.c_str());

        if(system(str.c_str())!= 0)
        {
            ROS_DEBUG("SpeechNode: Error on wav creation");
        }
        else
        {
            // Play created wav file using sox play with parameters bass,
            // treble, pitch, and vol
            std::string bass = " bass " + std::to_string(bass_);
            std::string treble = " treble " + std::to_string(treble_);
            std::string pitch = " pitch " + std::to_string(pitch_);

            if(norm_ == true)
            {
                str = "play " + filename + " --norm -q" + pitch + bass + treble;
            }
            else
            {
                std::string volume = " vol " + std::to_string(vol_);
                str = "play " + filename + " -q" + pitch + bass + treble + volume;
            }

            ROS_DEBUG("%s", str.c_str());

            if(system(str.c_str())!= 0)
            {
                ROS_DEBUG("SpeechNode: Error on wav playback");
            }
        }
    }

    // Set up to send talking finished
    finished_speaking_ = true;
    loop_count_down_ = (int)(LOOP_FREQUENCY_ * 2);
}
The speakingFinished function is called by the control loop in main. If we have kicked off the playback of either a wav file that already exists or our temporary wav file of text to speak, the function will count down each time it is called. When the counter reaches zero, the talking finished message is published. This gives the robot face node 2 seconds to animate the face before the finished speaking message is sent. You can increase this time if you find your robot has a lot to say, but bear in mind that the pico2wav is intended for use with a limited number of characters for text-to-speech conversion.
// If finshed speaking delay until the /robot_face/talking_finished topic is published
void SpeechNode::speakingFinished()
{
    if(finshed_speaking_ == true)
    {
        loop_count_down_--;

        if(loop_count_down_ <= 0)
        {
            finshed_speaking_ = false;

            // Send talking finished
            std_msgs::String msg;
            msg.data = "";
            talking_finished_pub_.publish(msg);
        }
    }
}
Face and Voice Integration
In our next tutorial, we will integrate the nodes from Goal 1 and Goal 2, along with a state machine package, to control the robot's missions. For now, let's test the robot's face with our speech node.
Our ROS package for the test node is called ease_robot_voice_test and is available in the ease_robot_voice_test folder.
The include/ease_robot_voice_test and src folders contain the C++ code for the package. For this package, we have one C++ class, EaseRobotVoiceTestNode, and a main routine contained within the ease_robot_voice_test_node.cpp file.
The main routine informs ROS of our node, creates an instance of the class for the node, and passes it the node handle, logs that the node has started, and hands control to ROS with the call to ros::spin.
int main(int argc, char **argv)
{
ros::init(argc, argv, "ease_robot_voice_test");
ros::NodeHandle n;
EaseRobotVoiceTestNode ease_test_node(n);
std::string node_name = ros::this_node::getName();
ROS_INFO("%s started", node_name.c_str());
ros::spin();
return 0;
}
We will use a keyboard node, available from https://github.com/lrse/ros-keyboard, to interact with the system. In the constructor, we subscribe to the topic keyboard/keydown and call the function keyboardCallBack when a message is received on that topic.
The constructor also advertises that the node will publish the topics for the speech and robot face node.
EaseRobotVoiceTestNode::EaseRobotVoiceTestNode(ros::NodeHandle n)
{
nh_ = n;

// Subscribe to receive keyboard input
key_sub_ = nh_.subscribe("keyboard/keydown", 100,
           &EaseRobotVoiceTestNode::keyboardCallBack, this);

// Advertise the topics we publish
speech_pub_ = nh_.advertise<speech::voice>("/speech/to_speak", 5);
face_status_pub_ = nh_.advertise<std_msgs::String>("/robot_face/expected_input", 5);
text_out_pub_ = nh_.advertise<std_msgs::String>("/robot_face/text_out", 5);

}
The function keyboardCallBack checks the received message for one of three keys. If the lower case's' is pressed, we test the status display functionality by creating a message and publishing it on the /robot_face/expected_input topic.
If the lower case 't' is pressed, we test the speech and speech animation by creating two messages, one that contains the text to speak and the other contains the text to animate the robot face. Note how we add the ':)' smiley to the greeting variable after we have used it to create the text to speak message, we don't want pico2wav trying to speak this as part of the text. We then publish the two messages, one to the face and the other to the speech node.
If the lower case 'w' is pressed, we test the wav file playback and speech animation again by creating two messages. This time, the message going to the speech node contains the path to a wav file instead of the text to speak. Notice however the message to the robot face still contains text to match the contents of the wav file so that the face is still animated during playback.
void EaseRobotVoiceTestNode::keyboardCallBack(const keyboard::Key::ConstPtr& msg)
{
// Check no modifiers apart from num lock is excepted
if((msg->modifiers & ~keyboard::Key::MODIFIER_NUM) == 0)
{
// Lower case
if(msg->code == keyboard::Key::KEY_s)
{
// Test status display
std_msgs::String status_msg;
status_msg.data = "EaseRobot on line";
face_status_pub_.publish(status_msg);
}
else if(msg->code == keyboard::Key::KEY_t)
{
// Test speech and animation

        // String to send to robot face
        std_msgs::String greeting;
        greeting.data = "Hello my name is EaseRobot";

        // Voice message
        speech::voice voice_msg;
        voice_msg.text = greeting.data;
        voice_msg.wav = "";

        // Add the smiley
        greeting.data += ":)";

        // Publish topics for speech and robot face animation
        text_out_pub_.publish(greeting);
        speech_pub_.publish(voice_msg);
    }
    else if(msg->code == keyboard::Key::KEY_w)
    {
        // Test wav playback and animation
        // String to send to robot face
        std_msgs::String greeting;
        greeting.data = "Danger Will Robinson danger:&";

        speech::voice voice_msg;
        std::string path = ros::package::getPath("ease_robot_voice_test");
        voice_msg.text = "";
        voice_msg.wav = path + "/sounds/lost_in_space_danger.wav";

        // Publish topics for sound and robot face animation
        text_out_pub_.publish(greeting);
        speech_pub_.publish(voice_msg);
    }
    else
    {
        ;
    }
}

}
The folder launch contains the file test.launch. This file will be used to launch the two nodes under test and the two test nodes from one terminal.
<?xml version="1.0"?>
<launch>
<node pkg="ease_home_robot_face" type="RobotFace" name="RobotFace" output="screen"/>
<node pkg="speech" type="speech_node" name="speech_node" output="screen"/>
<node pkg="ease_robot_voice_test" type="ease_robot_voice_test_node"
name="ease_robot_voice_test_node" output="screen" />
<node pkg="keyboard" type="keyboard" name="keyboard" output="screen" />
</launch>
Getting Started with The Code
Testing the Code
You can test the code on either a Linux PC or on the EaseRobot hardware, in this case, a Raspberry Pi.
If you're testing the code on a PC, you likely already have a speaker and amplifier built-in. However, since our EaseRobot is built around a Raspberry Pi, we need additional hardware to hear the voice playback. I've added an Adafruit Mono 2.5W Class D Audio Amplifier PAM8302 and an 8 Ohm speaker to the hardware. Simply connect this to the Pi audio jack, the speaker, and the Pi's 5V supply.
The audio amp is mounted on a small Veroboard attached to the back of the tilt arm, and the speaker is mounted on the front of the neck, just below the pan servo.
Hardware Considerations
While on the topic of hardware, I'd like to mention that when I first started running the EaseRobot face node, I encountered overheating issues with the Raspberry Pi during a heatwave. To mitigate this, I added a small heat sink and fan to the processor board. You can find a bracket to attach the fan to the Raspberry Pi in the 3D print zip folder.
System Applications
If not already installed, install the pico2wav and SoundeXchange applications using the following commands:
$ sudo apt-get install libttspico-utils
$ sudo apt-get install sox libsox-fmt-all
Building the ROS Packages
Create a workspace with the following commands:
$ mkdir -p ~/test_ws/src
$ cd ~/test_ws/
$ catkin_make
Copy the packages ease_robot_voice_test, speech, and ros-keyboard (from https://github.com/lrse/ros-keyboard) into the ~/test_ws/src folder and then build the code with the following commands:
$ cd ~/test_ws/
$ catkin_make
Check that the build completes without any errors.
Running the Code
Now we're ready to run our code. Use the launch file to start the nodes with the following commands. If no master node is running in the system, the launch command will also launch the master node, roscore.
$ cd ~/test_ws/
$ source devel/setup.bash
$ roslaunch ease_robot_voice_test test.launch
In the terminal, you should see:
- A list of parameters now in the parameter server
- A list of our nodes
- The address of the master
- Log information from our code
Two other windows will open, one with the EaseRobot face and a second that, when given focus, will input keyboard strokes.
In a second terminal, run the following command to start rqt_graph:
$ rqt_graph
From the graph, you should see the nodes under test and the test nodes running. You should also see the nodes linked by the topics. Any broken links indicate misspelled topics in the code.
The EaseRobot face will currently have a neutral expression. Run the following tests:
- Make sure the keyboard window has focus and press the's' key.
- The status message will appear below the face.
- Make sure the keyboard window has focus and press the 't' key.
- The EaseRobot voice will be heard, and the EaseRobot face mouth will be animated. It will end with a happy expression.
- Make sure the keyboard window has focus and press the 'w' key.
- The wav file playback will be heard, and the EaseRobot face mouth will be animated. It will end with a frightened expression.
Next, you can adjust the playback parameters of the voice. In a terminal, start rqt_reconfigure with the following command:
rosrun rqt_reconfigure rqt_reconfigure
This will bring up a user interface like the one shown below. Adjust the parameters, give the keyboard window focus, and press 't' to hear the difference.
Once you're happy with the values, you can edit the speech.cfg to include the values as the defaults. Then, the next time the speech node starts, these values will be used. Note that although the speech.cfg file is Python, you must re-make the package for the changes to take effect.
To terminate the nodes, hit Ctrl-c in the terminal.
If you've run the EaseRobot face node on the Raspberry Pi, you may have noticed that the face is not central to the screen. The flavor of Ubuntu (Lubuntu) I'm running on EaseRobot uses openbox for controlling the GUI. By editing.config/openbox/lubuntu-rc.xml and adding the following to the file, the EaseRobot Face is displayed in the center of the screen when it launches.
<application name="EaseRobotFace">
<position force="yes">
<x>200</x>
<y>0</y>
</position>
</application>

</applications>

</openbox_config>
Summary
In this segment, we've successfully infused EaseRobot with facial expressions and speech capabilities, thereby achieving our Design Goal 2.
Stay tuned for the next installment, where we'll delve into the state machine package that will orchestrate EaseRobot's mission control. We'll also explore the code that enables manual robot navigation and put it to the test on both the physical robot hardware and a simulated robot environment.