EaseRobot - A Cutting-Edge Autonomous Robot
Enhancing Our House Bot with Face Recognition and Head Control. In this installment of our ROS (Robot Operating System) House Bot series, we'll build upon the foundation established in Part 1 by incorporating face recognition and head control capabilities to achieve our Design Goal 1.
Introduction
The EaseRobot project is a hobbyist robotic endeavor aimed at designing and building an autonomous house-bot. This article is the second in the series, detailing the project's progress.
Background
In Part 1, we defined the requirements for our robot and broke down our mission into manageable Design Goals. Our mission, inspired by the article "Let's build a robot!", involves creating a robot that can take messages to family members. This capability will enable the robot to recognize individuals, navigate to their location, and deliver personalized messages.
The Design Goals for this mission are:
- To use the camera to search for faces, identify people, and display a message for recognized individuals
- To enable facial expressions and speech synthesis for message delivery
- To control locomotion using a remote keyboard and/or joystick
- To integrate a laser ranger finder or similar ranging sensor for navigation
- To achieve autonomous locomotion
- To assign and complete tasks with notification
In Part 1, we utilized ROS to add pan/tilt functionality to the head and camera. Here, we'll focus on adding face recognition and control nodes to complete Design Goal 1.
Mission 1, Design Goal 1 Continued
Accessing Images from the Raspberry Pi Camera
We'll leverage the ROS community's existing work to simplify our development process. The Raspberry Pi Ubuntu image includes a ROS package called raspicam_node, which we'll use to access the camera. If you're using a different OS image, you can install the node from the GitHub site.
To add the node to our system, we'll include a supplied ROS launch file in our launch file. We'll use an image resolution of 1280 x 960 pixels, so we'll add the following to our launch file:
<include file="$(find raspicam_node)/launch/camerav2_1280x960.launch" />
ROS uses its own image format to pass images between nodes. We'll need to convert ROS images to OpenCV images and back again using the cv_bridge package.
We'll write the face recognition node in Python, which will give us examples in both languages. We'll also utilize a Python face recognition library.
Detecting and Recognizing Faces
Before the system can recognize faces, we need to train it with the subjects we wish to recognize. We'll create two non-ROS Python scripts: data_set_generator.py and training.py. The first script will capture facial images of each subject using the camera, while the second script will use these images to train the system. The output of the second script is a yaml file containing the training data, which the ROS node will load during initialization.
Our ROS package for the node is called face_recognition and is available in the face_recognition folder. The subfolder scripts contains our two training scripts.
Each script utilizes face detection and face recognition built into OpenCV. If you're interested in understanding how this works, I recommend reading articles on the internet. I'll provide a high-level description of each script, starting with data_set_generator.py.
After the required imports, we load the classifier using the OpenCV library, declare a helper function to ensure that required folders exist, and create folders to hold captured images and training data
Next, we will guide you through the process of capturing face data for the EaseRobot project. This involves setting up the camera, creating a window to display the image, and prompting the user for input.
First, we set the camera resolution and initialize some variables, including the file name that stores our list of subjects. We then open the file and create a window to display the image read from the camera, allowing the subject to position themselves within the camera's field of view.
Next, the script prompts the user to enter the subject's unique ID, name, and whether it is a low-light condition. The unique IDs should start at 1 and increment by 1 for each new subject. It is recommended to run this script twice for each subject, once in bright light and once in low light conditions, to improve the recognition algorithm's success rate. Each run of the script will capture 100 images of the subject, with file names constructed from the subject ID and image number.
The script then adds the subject to the names file if they don't already exist.
with picamera.PiCamera() as camera:
  camera.resolution = (1280, 960)

  looping = True
  count = 0
  end = 99
  names_dict = {}
  name_file = '../trainer/names.yml'

  # Open the file of IDs and names to append the new one to
  if os.path.exists(name_file):
    with open(name_file, 'r') as stream:
      names_dict = yaml.load(stream)

  cv2.namedWindow('frame', cv2.WINDOW_NORMAL)

  face_id = input("What is this person's ID number? ")
  name = input("What is this person's name? ")
  low_light = input("Low light Y/N?" )

  if low_light == 'Y' or low_light == 'y':
    count = 100
    end = 199

  # If not already in the dictionary add details
  if not face_id in names_dict:
    names_dict[int(face_id)]=name

  with open(name_file, 'w') as outfile:
    yaml.dump(names_dict, outfile, default_flow_style=False)
The script then enters a loop to capture the images. Each pass of the loop captures an image from the camera, converts it to a numpy array, and attempts to detect a face in the image using OpenCV. If a face is detected, the image is cropped around the face, the number of image samples is incremented, and the cropped grey scale image is stored in the dataset folder. The original image from the camera, along with a superimposed frame around the face, is displayed to the user.
while(looping):
  # Create a memory stream so image doesn't need to be saved to a file
  stream = io.BytesIO()

  camera.capture(stream, format='jpeg')

  #Convert picture to numpy array
  buff = numpy.fromstring(stream.getvalue(), dtype=numpy.uint8)

  # Now create an OpenCV image
  image_frame = cv2.imdecode(buff, 1)

  # Convert frame to grayscale
  gray = cv2.cvtColor(image_frame, cv2.COLOR_BGR2GRAY)

  # Detect frames of different sizes, list of faces rectangles
  faces = face_detector.detectMultiScale(gray, 1.3, 5)

  # Although faces could contain more than one face we only expect one
  # person to be in the data set image otherwise it would confuse
  # the whole thing
  if (len(faces)!= 0):
    # Expecting one face only on the data set image
    (x, y, w, h) = faces[0]

    # Crop the image frame into rectangle
    cv2.rectangle(image_frame, (x,y), (x+w,y+h), (255,0,0), 4)

    # Increment sample face image
    count += 1

    # Save the captured image into the datasets folder
    cv2.imwrite("dataset/User." + str(face_id) + '.' + str(count) + ".jpg", gray[y:y+h,x:x+w])

    # Display the video frame, with bounded rectangle on the person's face
    cv2.imshow('frame', image_frame)

  # To stop taking video, press 'q' for at least 100ms
  if cv2.waitKey(100) & 0xFF == ord('q'):
    looping = False

  # If image taken reach 100, stop taking video
  elif count>end:
    looping = False
Finally, the script closes the window displaying the image and prints a message indicating that the process is complete.
# Close all started windows
cv2.destroyAllWindows()

print("Data prepared")
Once you have run the script for each subject, you can then run the training.py script to train the face recognition model.
The training.py script starts by importing the necessary libraries and defining the assure_path_exists function. It then creates instances of the OpenCV classes LBPHFaceRecognizer_create and CascadeClassifier using the same classifier file.
import cv2
import os
import numpy as np

def assure_path_exists(path):
  dir = os.path.dirname(path)
  if not os.path.exists(dir):
    os.makedirs(dir)

# Create Local Binary Patterns Histograms for face recognition
recognizer = cv2.face.LBPHFaceRecognizer_create()

# Using prebuilt frontal face training model, for face detection
detector = cv2.CascadeClassifier("../classifiers/haarcascade_frontalface_default.xml");
The get_images_and_labels function reads in each stored image, detects the face, and obtains the ID from the file name.
# Create method to get the images and label data
def get_images_and_labels(path):

  # Get all file paths
  image_paths = [os.path.join(path,f) for f in os.listdir(path)]

  # Initialize empty face samples
  face_samples=[]

  # Initialize empty IDs
  ids = []

  # Loop all the file paths
  for image_path in image_paths:

    # The stored image is grayscale so read in grayscale
    gray = cv2.imread(image_path, cv2.IMREAD_GRAYSCALE)

    # Get the image ID
    id = int(os.path.split(image_path)[-1].split(".")[1])

    # Get the face from the training images
    # Don't need any scaling as these images already full face
    faces = detector.detectMultiScale(gray);

    # During testing not always detected face on image, which
    # is odd as it should be just an image that was saved
    if (len(faces) == 0):
      print "No face on " + image_path

    else:
      # We know each image is only of one face
      (x, y, w, h) = faces[0]

      # Add the image to face samples
      face_samples.append(gray[y:y+h,x:x+w])

      # Add the ID to IDs
      ids.append(id)

  # Pass the face array and IDs array
  return face_samples,ids
Once all the faces and IDs are obtained, they are passed to the OpenCV face recognizer, and the data from the recognizer is saved to disk. The face recognition library that will be used by our node will later load this data to train the recognizer.
# Get the faces and IDs
faces,ids = get_images_and_labels('dataset')

# Train the model using the faces and IDs
recognizer.train(faces, np.array(ids))

# Save the model into trainer.yml
assure_path_exists('../trainer/')
recognizer.save('../trainer/trainer.yml')

print("Done")
The code for the ROS node itself is in the subfolder src in the file face_recognition_node.py. The code makes use of a library file, face_recognition_lib.py, which contains the class FaceRecognition. This file is in the subfolder src/face_recognition_lib.
Before describing the code for the node, we'll discuss the FaceRecognition class. After the required imports and the declaration of the class, it defines a number of functions.
The class constructor creates the OpenCV face recognizer and then reads the training file created by the training script. It then opens the file containing the list of names and the IDs, and creates the classifier. It finally stores a confidence value passed to it. This value will be used to determine if the suggested ID for the face is accepted.
def __init__(self, path, confidence):
  # Create Local Binary Patterns Histograms for face recognition
  self.__face_recognizer = cv2.face.LBPHFaceRecognizer_create()

  # Load the trained model
  self.__face_recognizer.read(path + '/trainer/trainer.yml')

  # Load the names file
  with open(path + '/trainer/names.yml', 'r') as stream:
    self.__names_dict = yaml.load(stream)

  # Detect object in image using Haarcascade Frontal Face
  self.__face_detector = cv2.CascadeClassifier
       (path + '/classifiers/haarcascade_frontalface_default.xml')

  # Confidence level,
  # the confidence of the system in recognising a face must be greater than
  # this level to be accepted by the system as a recognised face.
  self.__confidence_level = confidence
Two functions are declared which will be used to modify the captured image if a face is detected. The first will draw a rectangle on the image, and the second will draw the supplied text on the image.
# Function to draw rectangle on image according to given (x, y) coordinates
# and the given width and height
def draw_rectangle(self, img, rect, bgr):
  (x, y, w, h) = rect
  cv2.rectangle(img, (x, y), (x+w, y+h), bgr, 4)

# Function to draw text on give image starting at the passed (x, y) coordinates.
def draw_text(self, img, text, x, y, bgr):
  cv2.putText(img, text, (x, y), cv2.FONT_HERSHEY_PLAIN, 3.0, bgr, 4)
The detect_faces function is responsible for detecting faces in a supplied image. It converts the image to grayscale, allowing OpenCV to detect faces. If faces are detected, the function returns the face data and their locations in the image. This function is designed to handle multiple faces in a single image.
def detect_faces(self, img):
    face_data = []
    gray = cv2.cvtColor(img, cv2.COLOR_BGR2GRAY)
    faces_detected = self.__face_detector.detectMultiScale(gray, 1.3, 5)
    if len(faces_detected) == 0:
        return None, None
    for face in faces_detected:
        (x, y, w, h) = face
        face_data.append(gray[y:y+w, x:x+h])
    return face_data, faces_detected
The scan_for_faces function is the primary entry point for face detection and recognition. It calls the detect_faces function and, if faces are detected, loops through each face, using OpenCV's face predictor to recognize the individual. The confidence level of the prediction is converted to a percentage and, if it exceeds a predefined threshold, the face is highlighted in green; otherwise, it is highlighted in red. The function returns a dictionary containing the IDs and names of recognized individuals.
def scan_for_faces(self, img):
    faces, rects = self.detect_faces(img)
    detected_dict = {}
    if faces is not None:
        for index in range(len(faces)):
            label, confidence = self.__face_recognizer.predict(faces[index])
            our_confidence = round(100 - confidence, 2)
            name_text = self.__names_dict[label]
            name_text_confidence = name_text + " {0:.2f}%".format(our_confidence)
            if our_confidence > self.__confidence_level:
                colour = (0, 255, 0)
            else:
                colour = (0, 0, 255)
            self.draw_rectangle(img, rects[index], colour)
            self.draw_text(img, name_text_confidence, rects[index,0], rects[index,1]-5, colour)
            if our_confidence > self.__confidence_level:
                detected_dict[label] = name_text
    return detected_dict
The ROS node initializes the FaceRecognitionNode class, which creates an instance of CVBridge to convert ROS images to OpenCV images. It publishes the topic face_recognition_node/image/compressed and subscribes to the topic raspicam_node/image/compressed. The node reads the confidence threshold from the parameter server and sets it to 20% by default.
def main(args):
    rospy.init_node('face_recognition_node', anonymous=False)
    frn = FaceRecognitionNode()
    rospy.loginfo("Face recognition node started")
    try:
        rospy.spin()
    except KeyboardInterrupt:
        print("Shutting down")

if __name__ == '__main__':
    main(sys.argv)
The FaceRecognitionNode class is responsible for face detection and recognition, and its constructor initializes the necessary components for this functionality.
class FaceRecognitionNode:
    def __init__(self):
        self.__bridge = CvBridge()
        self.__image_pub = rospy.Publisher('face_recognition_node/image/compressed',
                            CompressedImage, queue_size=1)
        self.__image_sub = rospy.Subscriber('raspicam_node/image/compressed',
                           CompressedImage, self.callback)

        confidence_level = rospy.get_param('/face_rec_python/confidence_level', 20)
        rospy.loginfo("FaceRecognitionNode: Confidence level %s", str(confidence_level))

        # Create the face_recognition_lib class instance
        self.__frc = face_recognition_lib.FaceRecognition(
            (roslib.packages.get_pkg_dir('face_recognition', required=True), confidence_level)
        )

        # Create the Action server
        self.__as = actionlib.SimpleActionServer(
            'face_recognition', scan_for_facesAction, self.do_action, False
        )
        self.__as.start()
The do_action function is called by the action server when a request to conduct the action is received. It converts the last received image from a ROS image to an OpenCV image, scans the image for known faces using the scan_for_faces function, and publishes the adjusted image on the face_recognition_node/image/compressed topic.
def do_action(self, goal):
    # Scan the current image for faces recognised
    image = self.__bridge.compressed_imgmsg_to_cv2(self.__current_image)
    detected_dict = self.__frc.scan_for_faces(image)

    try:
        self.__image_pub.publish(self.__bridge.cv2_to_compressed_imgmsg(image))
    except CvBridgeError as e:
        print(e)

    # Now post a message with the list of IDs and names
    ids = []
    names = []
    for k, v in detected_dict.items():
        ids.append(k)
        names.append(v)
    # Set result for the action
    result = scan_for_facesResult()
    result.ids_detected = ids
    result.names_detected = names
    self.__as.set_succeeded(result)
The callback function is called each time a message is received on the raspicam/image/compressed topic. It simply stores the current image for facial recognition.
def callback(self, data):
    # Each time we receive an image we store it ready in case then asked to scan it
    self.__current_image = data
The node package includes a config.yaml file for setting the confidence level without recompiling the code. Additionally, a test.launch file is provided for testing the node, which launches the camera node and the face recognition node.
Face Recognition Action
The face recognition package utilizes a user-defined action message to initiate the operation and return the results of identifying known faces. The face_recognition_msgs package contains the scan_for_faces.action file, which is located in the action subfolder.
The action specification consists of three main sections: goal, result, and feedback. It resembles a message definition file, with each section separated by three dashes (---).
uint16[] ids_detected
string[] names_detected
The goal section, above the first three dashes, does not require any parameters. The receipt of the goal will trigger the action.
The result section, below the first three dashes, contains an array of IDs and an array of names for any recognized faces.
The feedback section, below the second three dashes, does not provide any feedback in this case.
Controlling the Head
We have now developed a node to perform facial recognition on an image from the camera and, from part 1 of this article, we have the pan/tilt functionality to move the servos connected to the head. We will create a new node that accepts a target position for the head, but moves the head to that target in incremental steps to prevent the robot from rocking when the head moves from one extreme to the other. The node will also accept both absolute positions and relative distances to move from the current position.
Our ROS package for this node is called head_control and is located in the head_control folder. The package contains all the usual ROS files and folders.
The action folder contains the point_head.action file, which defines an action that passes a goal containing the target position and feedback on the current position of the head.
bool absolute
float64 pan
float64 tilt
float64 current_pan
float64 current_tilt
The goal contains pan and tilt values in radians, as well as a boolean flag absolute. If absolute is true, the pan and tilt values represent the absolute target position. If absolute is false, the values represent the relative distance to move the head.
The feedback values provide the current position of the head as it moves towards the target position.
The config folder contains a config.yaml file that can be used to override default configuration values. You can configure:
The default position of the head The maximum value the pan and tilt device should move per request, to prevent the servo from moving a large angle in one step and causing the head to shudder
head:
position:
pan: 0.0
tilt: 0.0
max_step:
pan: 0.0872665
tilt: 0.0872665
The include/head_control and src folders contain the C++ code for the package. We have one C++ class, HeadControlNode, and a main routine within the head_control_node.cpp file.
The main routine informs ROS of our node, creates an instance of the class for the node, and passes it the node handle and node name. For the first time in this project, we will not hand total control of the node to ROS. Instead, we will retain control to move the servos in small incremental steps to a target position.
Before entering the loop, we create an instance of ros::Rate and pass it the desired timing, in this case, 10Hz. Inside the loop, we call r.sleep, which attempts to maintain the loop at 10Hz by accounting for the time used to complete the work in the loop.
Our loop will continue until the call to ros::ok returns false, indicating that the node has finished shutting down.
In the loop, we will call moveServo, which is described later in the article.
int main(int argc, char **argv)
{
ros::init(argc, argv, "head_control_node");
ros::NodeHandle n;
std::string node_name = ros::this_node::getName();
HeadControlNode head_control(n, node_name);
ROS_INFO("%s started", node_name.c_str());

// We need control of the node to step the servos to the target position in small steps
ros::Rate r(10); // 10Hz

while(ros::ok())
{
    // Check if the servos need moving
    head_control.moveServo();

    ros::spinOnce();
    r.sleep();
}
return 0;

}
The rest of the file contains the HeadControlNode class.
The constructor for HeadControlNode registers the callback function pointHeadCallback with the action server. This callback will be called when the action server receives the action goal, initiating the action.
The constructor for the HeadControlNode class initializes the action server and sets up the node's configuration. It starts the server with the as_.start() call.
The constructor advertises that it will publish the pan_tilt_node/joints topic, which will be used to pass the required pan/tilt position to the pan/tilt node.
// Constructor
HeadControlNode::HeadControlNode(ros::NodeHandle n, std::string name) : as_(n, name, false)
{
    nh_ = n;

    as_.registerGoalCallback(boost::bind(&HeadControlNode::pointHeadCallback, this));
    as_.start();

    // Topic to move head
    move_head_pub_ = nh_.advertise<sensor_msgs::JointState>("pan_tilt_node/joints", 10, true);

    // Obtain any configuration values from the parameter server.
    // If they don't exist use the defaults

    // Joint names
    nh_.param<std::string>("/servo/index0/pan/joint_name", pan_joint_name_, "reserved_pan0");
    nh_.param<std::string>("/servo/index0/tilt/joint_name", tilt_joint_name_, "reserved_tilt0");

    // Maximum angle we can move in one go
    nh_.param("/head/max_step/pan", pan_step_, 0.174533);
    nh_.param("/head/max_step/tilt", tilt_step_, 0.174533);

    double pan;      // Pan default position to return to
    double tilt;     // Tilt default position to return to
    nh_.param("/head/position/pan", pan, 0.0);
    nh_.param("/head/position/tilt", tilt, 0.0);
    default_position_.pan = pan;
    default_position_.tilt = tilt;

    // Set up the message we will publish
    msg_.name.push_back(pan_joint_name_);
    msg_.name.push_back(tilt_joint_name_);
    msg_.position.push_back(0.0);
    msg_.position.push_back(0.0);

    // We will often return to this position when a task is completed
    current_pan_tilt_ = default_position_;
    // We don't know where the servo starts from so just jump to the required position
    // Publish a start position to get the head in a known position.
    publishJointState(current_pan_tilt_);

    move_head_ = false;
    movement_complete_ = false;
    target_pan_tilt_ = current_pan_tilt_;
}
It then sets some configuration defaults and reads any overrides from the parameter server should they be available.
Next, it sets the names of the joints in the joint state message, which will not change.
Finally, it publishes a message to move the head to a known starting point. This is necessary because we don't know the starting position of the head after power-up, so we can't move to the target position in small steps.
// This callback is for the point head action
void HeadControlNode::pointHeadCallback()
{
    head_control::point_headGoal::ConstPtr goal;

    goal = as_.acceptNewGoal();

    // Set the target position to the request position
    if (goal->absolute == true)
    {
        target_pan_tilt_.pan = goal->pan;
        target_pan_tilt_.tilt = goal->tilt;
    }
    else
    {
        target_pan_tilt_.pan += goal->pan;
        target_pan_tilt_.tilt += goal->tilt;
    }

    // Indicate that the servos should be moved
    move_head_ = true;

    movement_complete_ = false;
}
The pointHeadCallback function is called by ROS when the action server receives a goal message. The goal data is either the absolute or relative target position, depending on the state of the absolute flag.
The function calls the action server to inform it that the goal has been accepted, stores the new target position, and sets the move_head flag to true, indicating that the head needs to be moved.
// Function to move the servos if required by a step amount.
// This is to stop the head shuddering if the servo
// is moved to the target position in one movement.
void HeadControlNode::moveServo()
{
    if(move_head_ == true)
    {
        if(as_.isPreemptRequested() || !ros::ok())
        {
            as_.setPreempted();
            movement_complete_ = false;
            move_head_ = false;
        }
        else if(movement_complete_ == true)
        {
            // We have reached the target but give time to settle
            loop_count_down_--;

            if(loop_count_down_ <= 0)
            {
                movement_complete_ = false;
                move_head_ = false;
                head_control::point_headResult result;
                as_.setSucceeded(result);
            }
        }
        else
        {
            if((target_pan_tilt_.pan == current_pan_tilt_.pan) &&
               (target_pan_tilt_.tilt == current_pan_tilt_.tilt))
            {
                // Last time around we must have requested the final move
                movement_complete_ = true;
                loop_count_down_ = 8;
            }
            else
            {
                // Still moving, calculate pan movement
                if(std::abs(target_pan_tilt_.pan - current_pan_tilt_.pan) > pan_step_)
                {
                    // Distance to target to great to move in one go
                    if(target_pan_tilt_.pan > current_pan_tilt_.pan)
                    {
                        // Add the step to current
                        current_pan_tilt_.pan += pan_step_;
                    }
                    else
                    {
                        // Subtract step from current
                        current_pan_tilt_.pan -= pan_step_;
                     }
                }
                else
                {
                    // Can move to the target position in one go
                    // (or pan is in fact already there but tilt is not)
                    current_pan_tilt_.pan = target_pan_tilt_.pan;
                }

                // Calculate tilt movement
                if(std::abs(target_pan_tilt_.tilt - current_pan_tilt_.tilt) > tilt_step_)
                {
                    // Distance to target to great to move in one go
                    if(target_pan_tilt_.tilt > current_pan_tilt_.tilt)
                    {
                        // Add the step to current
                        current_pan_tilt_.tilt += tilt_step_;
                    }
                    else
                    {
                        // Subtract step from current
                        current_pan_tilt_.tilt -= tilt_step_;
                     }
                }
                else
                {
                    // Can move to the target position in one go
                    // (or tilt is in fact already there but pan is not)
                    current_pan_tilt_.tilt = target_pan_tilt_.tilt;
                }

                // Publish the movement
                publishJointState(current_pan_tilt_);

                // Publish feedback
                head_control::point_headFeedback feedback;
                feedback.current_pan = current_pan_tilt_.pan;
                feedback.current_tilt = current_pan_tilt_.tilt;
                as_.publishFeedback(feedback);
            }
        }
    }
}
The moveServo function is called by the main loop in our code. It checks to see if a request to move the head was made and, if so, enters an 'if', 'else if', 'else' construct.
The 'if' part of this construct checks to see if the action has been pre-empted. If so, it accepts the pre-emption and tidies up.
The 'else if' part checks to see if the head movement is complete. If so, a counter is decremented. This counter is used to include time for the head to stop moving and blurring any camera images after the servos reach the target position. When the counter reaches zero, the fact that the action is complete is reported to the action server.
The 'else' part is responsible for calculating the next step movement of the servos towards the target position, publishing the joint state message with the next required servo position using the helper function publishJointState, and reporting the feedback to the action server.
// This function creates and publishes a joint state message
void HeadControlNode::publishJointState(struct position pan_tilt)
{
    msg_.position[0] = pan_tilt.pan;
    msg_.position[1] = pan_tilt.tilt;
    msg_.header.stamp = ros::Time::now();

    move_head_pub_.publish(msg_);
}
The publishJointState function is a helper function that updates the position values in the joint state message and then publishes the message.
This file, test.launch, will launch all the nodes developed to move the head.
<?xml version="1.0" ?>
<launch>
  <rosparam command="load" file="$(find pan_tilt)/config/config.yaml" />
  <rosparam command="load" file="$(find head_control)/config/config.yaml" />

  <node pkg="pan_tilt" type="pan_tilt_node" name="pan_tilt_node" output="screen" />
  <node pkg="rosserial_python" type="serial_node.py"
   name="serial_node" output="screen" args="/dev/ttyUSB0"/>
  <node pkg="head_control" type="head_control_node" name="head_control_node" output="screen"/>
</launch>
Action Client
In our previous sections, we explored the concept of action servers in both our nodes. Now, we will delve into the world of action clients, which enable communication with the server. Later in this article, we will introduce a ROS package that allows us to create state machines and sub-state machines to control our robot missions. Using this package, we can assign an individual state to be the action client, and all communication is handled seamlessly behind the scenes.
To test the system we have developed so far and to demonstrate how to write an action client, we will create two test nodes. Each node will include an action client.
Our first node is a simple Python node designed to test the face recognition node. The ROS package for this node is called ease_robot_recognition_test and is available in the ease_robot_recognition_test folder. The package contains all the usual ROS files and folders.
All the code is contained in the ease_robot_recognition_test_node.py file in the src folder.
The code initializes our node and creates an action client. Note that the name passed to the SimpleActionClient, in our case 'face_recognition', must match the name given to the action server.
We then call wait_for_server, and the code will wait here until it is able to make contact with the server. We then create a goal, which in this case contains no data, and send the goal to the server.
In our simple example, we then wait until the result is returned, and the node finishes by printing the ID and names of any faces recognized and returned in the result.
#!/usr/bin/env python

import rospy
import actionlib
from face_recognition_msgs.msg import scan_for_facesAction,
     scan_for_facesGoal, scan_for_facesResult

rospy.init_node('face_recognition_client')
client = actionlib.SimpleActionClient('face_recognition', scan_for_facesAction)
client.wait_for_server()
goal = scan_for_facesGoal()
client.send_goal(goal)
client.wait_for_result()
result = client.get_result()
print(result.ids_detected)
print(result.names_detected)
Our next package is designed to test the head_control node. We will write a slightly more complicated node, this time written in C++.
Our ROS package is called ease_robot_head_test and is available in the ease_robot_head_test folder. The package contains all the usual ROS files and folders.
The include/ease_robot_head_test and src folders contain the C++ code for the package. For this package, we have one C++ class, EaseRobotHeadTestNode, and a main routine contained within the ease_robot_head_test_node.cpp file.
The main routine informs ROS of our node, creates an instance of the class for the node, and passes it the node handle, logs that the node has started, and hands control to ROS with the call to ros::spin.
int main(int argc, char **argv)
{
    ros::init(argc, argv, "ease_robot_head_test");
    ros::NodeHandle n;
    EaseRobotHeadTestNode ease_robot_head_test_node(n);
    std::string node_name = ros::this_node::getName();
    ROS_INFO("%s started", node_name.c_str());
    ros::spin();
    return 0;
}
The constructor creates an instance of our action client, ac_, and passes it the name of the action server, which in our case is head_control_node. This must match the name we gave to our action server when we created it in the HeadControlNode constructor.
We then read the config parameters to limit the movement of the servos.
We are going to use a keyboard node, available from https://github.com/lrse/ros-keyboard, to interact with the system. In the constructor, we subscribe to the topic keyboard/keydown and call the function keyboardCallBack when a message is received on that topic.
The call ac_.waitForServer will wait in the constructor until our action server is running.
// Constructor
EaseRobotHeadTestNode::EaseRobotHeadTestNode(ros::NodeHandle n) : ac_("head_control_node", true)
{
    nh_ = n;

    // Subscribe to receive keyboard input
    key_sub_ = nh_.subscribe("keyboard/keydown", 100,
               &EaseRobotHeadTestNode::keyboardCallBack, this);

    nh_.param("/servo/index0/pan/max", max_pan_radians_, M_PI/2.0);
    nh_.param("/servo/index0/pan/min", min_pan_radians_, -(M_PI/2.0));
    nh_.param("/servo/index0/tilt/max", max_tilt_radians_, M_PI/2.0);
    nh_.param("/servo/index0/tilt/min", min_tilt_radians_, -(M_PI/2.0));

    ROS_INFO("EaseRobotHeadTestNode: Waiting for action server to start");

    // wait for the action server to start
    ac_.waitForServer(); //will wait for infinite time

    moving_ = false;

    ROS_INFO("EaseRobotHeadTestNode: Action server started");
}
The function keyboardCallBack checks the received message and runs a test dependent on the key pressed.
It creates an instance of our action goal, sets the goal parameters, and passes it to the action server with a call to ac_.sendGoal. With the call, we pass three callback functions:
doneCBwhich is called when the action is completedactiveCBwhich is called when the action goes active andfeedbackCBwhich is called when the feedback on the progress of the action is received
The action can be pre-empted, so if the 'c' key is pressed and moving the head is in progress, we will cancel the action with a call to ac_.cancelGoal.
void EaseRobotHeadTestNode::keyboardCallBack(const keyboard::Key::ConstPtr& msg)
{
    head_control::point_headGoal goal;

    // Check for key 1 with no modifiers apart from num lock is allowed
    if((msg->code == keyboard::Key::KEY_1) &&
      ((msg->modifiers & ~keyboard::Key::MODIFIER_NUM) == 0))
    {
        // Key 1, Test 1 move to max pan and tilt
        goal.absolute = true;
        goal.pan      = max_pan_radians_;
        goal.tilt     = max_tilt_radians_;
        // Need boost::bind to pass in the 'this' pointer
        ac_.sendGoal(goal,
            boost::bind(&EaseRobotHeadTestNode::doneCB, this, _1, _2),
            boost::bind(&EaseRobotHeadTestNode::activeCB, this),
            boost::bind(&EaseRobotHeadTestNode::feedbackCB, this, _1));
    }
    if((msg->code == keyboard::Key::KEY_2) &&
      ((msg->modifiers & ~keyboard::Key::MODIFIER_NUM) == 0))
    {
        // Key 2, test 2 move to min pan and tilt
        goal.absolute = true;
        goal.pan      = min_pan_radians_;
        goal.tilt     = min_tilt_radians_;
        // Need boost::bind to pass in the 'this' pointer
        ac_.sendGoal(goal,
            boost::bind(&EaseRobotHeadTestNode::doneCB, this, _1, _2),
            boost::bind(&EaseRobotHeadTestNode::activeCB, this),
            boost::bind(&EaseRobotHeadTestNode::feedbackCB, this, _1));
    }
    if((msg->code == keyboard::Key::KEY_3) &&
      ((msg->modifiers & ~keyboard::Key::MODIFIER_NUM) == 0))
    {
        // Key 3, test 3 move to pan 0, tilt 0
        goal.absolute = true;
        goal.pan      = 0.0;
        goal.tilt     = 0.0;
        // Need boost::bind to pass in the 'this' pointer
        ac_.sendGoal(goal,
            boost::bind(&EaseRobotHeadTestNode::doneCB, this, _1, _2),
            boost::bind(&EaseRobotHeadTestNode::activeCB, this),
            boost::bind(&EaseRobotHeadTestNode::feedbackCB, this, _1));
    }
    if((msg->code == keyboard::Key::KEY_4) &&
      ((msg->modifiers & ~keyboard::Key::MODIFIER_NUM) == 0))
    {
        // Key 4, test 4 move to pan 0, tilt -45 degress
        goal.absolute = true;
        goal.pan      = 0.0;
        goal.tilt     = -0.785398;
        // Need boost::bind to pass in the 'this' pointer
        ac_.sendGoal(goal,
            boost::bind(&EaseRobotHeadTestNode::doneCB, this, _1, _2),
            boost::bind(&EaseRobotHeadTestNode::activeCB, this),
            boost::bind(&EaseRobotHeadTestNode::feedbackCB, this, _1));
    }
    if((msg->code == keyboard::Key::KEY_5) &&
      ((msg->modifiers & ~keyboard::Key::MODIFIER_NUM) == 0))
    {
        // Key 5, test 5 move tilt up by 10 degrees
        goal.absolute = false;
        goal.pan      = 0;
        goal.tilt     = -0.174533;
        // Need boost::bind to pass in the 'this' pointer
        ac_.sendGoal(goal,
            boost::bind(&EaseRobotHeadTestNode::doneCB, this, _1, _2),
            boost::bind(&EaseRobotHeadTestNode::activeCB, this),
            boost::bind(&EaseRobotHeadTestNode::feedbackCB, this, _1));
    }
    if((msg->code == keyboard::Key::KEY_6) &&
      ((msg->modifiers & ~keyboard::Key::MODIFIER_NUM) == 0))
    {
        // Key 6, test 6 move pan by 20 anti-clockwise
        goal.absolute = false;
        goal.pan      = 0.349066;
        goal.tilt     = 0;
        // Need boost::bind to pass in the 'this' pointer
        ac_.sendGoal(goal,
            boost::bind(&EaseRobotHeadTestNode::doneCB, this, _1, _2),
            boost::bind(&EaseRobotHeadTestNode::activeCB, this),
            boost::bind(&EaseRobotHeadTestNode::feedbackCB, this, _1));
    }
    if((msg->code == keyboard::Key::KEY_7) &&
      ((msg->modifiers & ~keyboard::Key::MODIFIER_NUM) == 0))
    {
        // Key 7, test 7 move pan by 20 clockwise and tilt by 10 down
        goal.absolute = false;
        goal.pan      = -0.349066;
        goal.tilt     = 0.174533;
        // Need boost::bind to pass in the 'this' pointer
        ac_.sendGoal(goal,
            boost::bind(&EaseRobotHeadTestNode::doneCB, this, _1, _2),
            boost::bind(&EaseRobotHeadTestNode::activeCB, this),
            boost::bind(&EaseRobotHeadTestNode::feedbackCB, this, _1));
    }
    else if((msg->code == keyboard::Key::KEY_c) &&
           ((msg->modifiers & ~EaseRobotHeadTestNode::SHIFT_CAPS_NUM_LOCK_) == 0))
    {
        // Key 'c' or 'C', cancel action
        if(moving_ == true)
        {
            ac_.cancelGoal();
        }
    }
    else
    {
        ;
    }
}
The callback function activeCB is called when the action goes active, at which point we log the fact and set a member variable indicating that movement is taking place.
// Called once when the goal becomes active
void EaseRobotHeadTestNode::activeCB()
{
    ROS_INFO("EaseRobotHeadTestNode: Goal just went active");

    moving_ = true;
}
The callback function feedbackCB is called when feedback on the progress of the action is received. If you recall, our feedback includes the current position of the servos on their way to the target position.
// Called every time feedback is received for the goal
void EaseRobotHeadTestNode::feedbackCB(const head_control::point_headFeedbackConstPtr& feedback)
{
    ROS_INFO("Feedback pan=%f, tilt=%f", feedback->current_pan, feedback->current_tilt);
}
The callback function doneCB is called when the action is completed. In this case, the result data is empty.
// Called once when the goal completes
void EaseRobotHeadTestNode::doneCB(const actionlib::SimpleClientGoalState& state,
                        const head_control::point_headResultConstPtr& result)
{
    ROS_INFO("EaseRobotHeadTestNode: Finished in state [%s]", state.toString().c_str());
    moving_ = false;
}
Using the Code
In this article, we will test the two nodes individually. In Part 4, we will put the two together so that the robot can scan a room within its head movement range looking for faces it recognises.
As previously when testing the code, I'm going to run the system code on the Raspberry Pi and the test code on a separate Linux workstation. The Raspberry Pi will also be connected to the Arduino nano which in turn is connected to the servos and running the sketch from part one of the article.
Note that to distinguish between the Pi and the workstation in the instructions below, the code is in a folder (workspace) called "easerobot_ws" on the Pi and "test_ws" on the workstation. Building the ROS Packages on the Pi
If not already done, create a catkin workspace on the Raspberry Pi and initialise it with the following commands:
$ mkdir -p ~/easerobot_ws/src
$ cd ~/easerobot_ws/
$ catkin_make
Copy the packages face_recognition, face_recognition_msgs, head_control, pan_tilt, and servo_msgs into the ~/easerobot_ws/src folder and then build the code. As a little tip, I don't copy the code into the src folder but create a symbolic link in the src folder to the code location. That way, I can have a number of workspaces using the same code files.
$ cd ~/easerobot_ws/
$ catkin_make
Check that the build completes without any errors.
Building the ROS Test Packages on the Workstation
You can build and run the test packages on the Raspberry Pi but I'm going to use a Linux workstation which is on the same network as the Pi.
Create a workspace with the following commands:
$ mkdir -p ~/test_ws/src
$ cd ~/test_ws/
$ catkin_make
Copy the packages face_recognition, face_recognition_msgs, head_control, pan_tilt, servo_msgs, easerobot_recognition_test, easerobot_head_test, and ros-keyboard (from https://github.com/lrse/ros-keyboard) into the ~/test_ws/src folder and then build the code with the following commands:
$ cd ~/test_ws/
$ catkin_make
Check that the build completes without any errors.
Tip
When running ROS code and tools on a workstation and the Raspberry Pi, there can be a lot of repeat typing of commands at a number of terminals. In the next section, I have included the full commands to type but here are a few tips that can save you all that typing.
On the Raspberry Pi to save typing "source devel/setup.bash" I have added it to the .bashrc file for the Raspberry Pi.
$ cd ~/
$ nano .bashrc
Then add "source /home/ubuntu/easerobot_ws/devel/setup.bash" to the end of the file, save and exit.
When running test code and tools on the workstation, it also needs to know where the ROS master is so I have added the following to the .bashrc file for the workstation.
alias easerobot='source ~/test_ws/devel/setup.bash; \
export ROS_MASTER_URI=http://ubiquityrobot:11311'
Then by just typing "easerobot" at a terminal, the two commands are run and a lot of typing is saved.
Running the Code
First, we will test the face recognition node. Use the launch file to start the nodes with the following commands on the Raspberry Pi:
$ cd ~/easerobot_ws/
$ source devel/setup.bash
$ roslaunch face_recognition test.launch
With the nodes running on the Raspberry Pi, I'm going to use a Linux workstation on the same network to run some tests. Note: As we will use our user defined topics, the code also needs to be built on this workstation. You can, if you wish, run the tests on the same Raspberry Pi running the system nodes.
At the workstation, run the following to check that the nodes are running and connected to the correct topics. You can see the name of master in the output from running roslaunch. As I'm using the Ubiquity ROS Ubuntu image and have not changed the name, my master is ubiquityrobot.
$ export ROS_MASTER_URI=http://ubiquityrobot:11311
$ rqt_graph
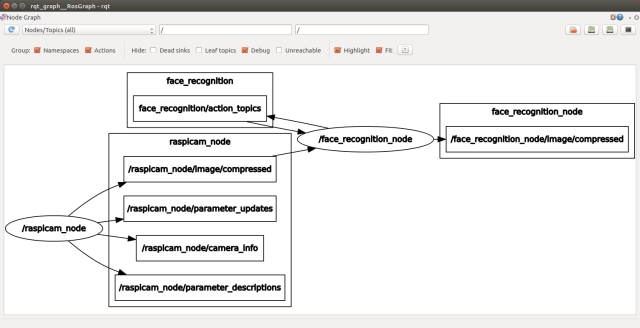
If any topics have been misspelt in one part of the code, then it will be obvious from the graph as the nodes will not be joined by the topics.
In another terminal, enter the following in order to be able to view the images.
$ export ROS_MASTER_URI=http://ubiquityrobot:11311
$ rqt_image_view
In the Image View GUI, you can select the topic /raspicam/image/compressed to view the current camera image. For the test, I'm going to select the topic /face_recognition_node/image/compressed, the image will currently be blank but when we request a face recognition operation, we will be able to view the result.
In a new terminal, run the test node to conduct the face recognition process on an image from the camera.
$ cd ~/test_ws
$ export ROS_MASTER_URI=http://ubiquityrobot:11311
$ source devel/setup.bash
$ rosrun easerobot_recognition_test easerobot_recognition_test_node.py
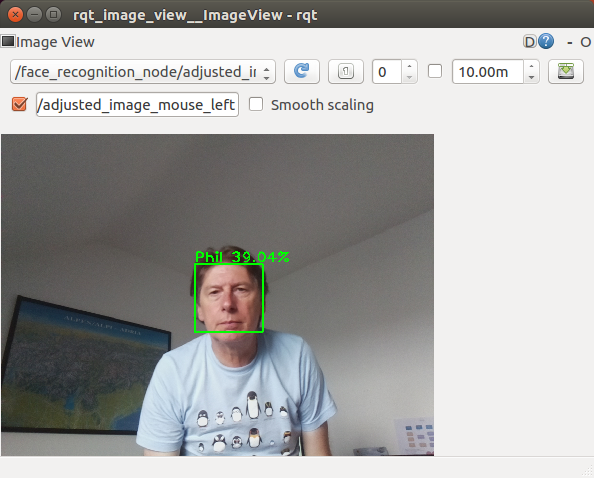
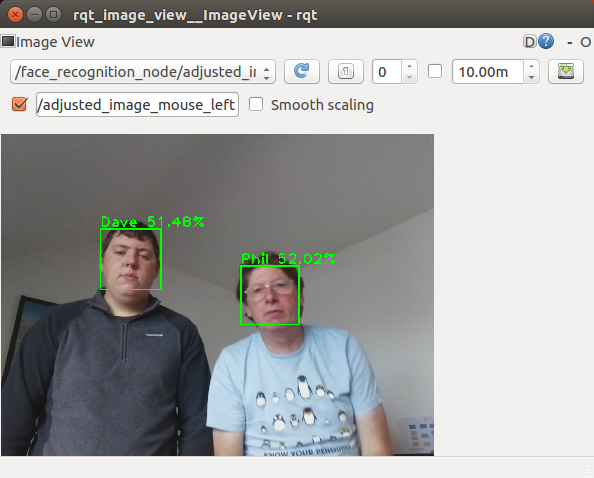
You can rerun the process by just entering the last line again in the same terminal. The result of each run will be shown in the rqt_image_view window and output in the terminal.
When I ran the test without anyone in view of the camera, the image viewer displayed an image of the room and the terminal reported empty results with:
() []
When run with myself in view of the camera, the terminal and the image viewer displayed the following:
(1,) ['Phil']
When testing with two people in the image, it's trained for both these subjects, I got the following results:
(1, 2,) [Phil, Dave]
You can close down each terminal on the workstation and the Pi by entering Ctrl-C in the terminal.
Next we will test the head control node. With the Arduino connected to a USB port of the Pi, use the launch file to start the nodes with the following commands:
You can rerun the process by just entering the last line again in the same terminal. The result of each run will be shown in the rqt_image_view window and output in the terminal.
$ cd ~/easerobot_ws/
$ source devel/setup.bash
$ roslaunch head_control test.launch
When the code starts, the head will move to the default position.
Next, I'm going to use rqt_graph and our test code to test the system. On the workstation, run the following commands to start the keyboard node:
$ cd ~/test_ws
$ source devel/setup.bash
$ export ROS_MASTER_URI=http://ubiquityrobot:11311
$ rosrun keyboard keyboard
On the workstation in a second terminal, run the following commands to start our test node:
$ cd ~/test_ws
$ source devel/setup.bash
$ export ROS_MASTER_URI=http://ubiquityrobot:11311
$ rosrun easerobot_head_test easerobot_head_test_node
In a third terminal, run the following commands to start rqt_graph:
$ cd ~/test_ws
$ export ROS_MASTER_URI=http://ubiquityrobot:11311
$ rqt_graph
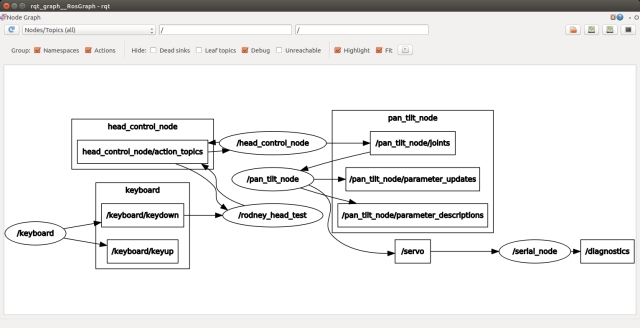
From the graph, you should see the nodes under test and the test code running. You should also see the nodes linked by the topics. Any broken links is an indication of misspelt topics in the code.
The workstation should also be running a small window whose title is "ROS keyboard input". Make sure this window has the focus and then press a key for the following tests. During a scan head movement, you can press the 'c' key to cancel the action.
- Key '1' - The head will move to the maximum pan and tilt position (left and down)
- Key '2' - The head will move to the minimum pan and tilt position (right and up)
- Key '3' - The head will move back to zero pan and tilt position
- Key '4' - The head will tilt to up to the 45 degrees position
- Key '5' - The head will move up from the current position by 5 degrees
- Key '6' - The head will move anti-clockwise (left) from the current position by 20 degrees
- Key '7' - The head will move clockwise (right) from the current position by 20 degrees and down by 10 degrees
Summary
In this installment, we've successfully integrated face recognition and head control capabilities into our code, thereby fulfilling Design Goal 1.
Stay tuned for the next article, where we'll breathe life into EaseRobot by adding facial expressions and speech, ultimately achieving Design Goal 2.